• For more information on how to avoid pop-up ads and still support SkiTalk click HERE.

Building a truck bed shell

oldschoolskier

Making fresh tracks
Skier
Joined
Dec 6, 2015
Posts
4,287
Location
Ontario Canada
I’m going to leave out a few details but, years ago I met the owner of a company that told me how they tested for wind loading. Product (about 30’ x 40’) strapped to the top of a F250 and drive at close to a 100mph on the Bonneville Salt Flats. Imay be crazy but :geek:.
 

Rich McP

H20nSnow Elsewhere
Skier
SkiTalk Supporter
Joined
Dec 21, 2015
Posts
431
Location
Breck whenever possible
I dare say that's even greener than this guy.

Is that rocket surgeon actually serious? I couldn't bring myself to watch the whole thing. Does he believe he created a working perpetual motion machine or does he explain in the end that the idea is just dumb?
 

cantunamunch

Meh
Skier
Joined
Nov 17, 2015
Posts
22,184
Location
Lukey's boat
Is that rocket surgeon actually serious? I couldn't bring myself to watch the whole thing. Does he believe he created a working perpetual motion machine or does he explain in the end that the idea is just dumb?

As serious as a high school science experiment; he makes several observations that he will use later in the 7000W turbine video, including lift proportionality to angle of attack, minimum drag angles, relative wind, how much to change pitch with radius, and, most importantly, he begins looking at Betz' limit (16/27) to how much energy he can extract. Given all that, and youtube monetization, yeh, dead serious. :D
 

DanoT

RVer-Skier
Skier
SkiTalk Supporter
Joined
Nov 12, 2015
Posts
4,807
Location
Sun Peaks B.C. in winter, Victoria B.C. in summer
Is that rocket surgeon actually serious? I couldn't bring myself to watch the whole thing. Does he believe he created a working perpetual motion machine or does he explain in the end that the idea is just dumb?
He says that the wind turbine he is using is cannot handle anything but driving at low speeds.

I sub to a RVer Youtuber who has experimented with setting up a wind turbine when camped. His conclusion: The size of turbine needed to produce a decent amount of electricity would be so large as to not be practical.
 

teejaywhy

Retired Eccentric
Skier
SkiTalk Supporter
Joined
Feb 19, 2019
Posts
1,287
Location
AZ
I have determined I have about a 15% loss in mileage so am thinking in earnest about some fairing/deflectors.

I don't want to put a roof rack on just to hold a deflector so I'm trying to come up with ideas for a fiberglass fairing that will mount directly to the front of the shell. I don't envision the fairing integrating directly to the truck as the bed and shell will move a bit.

I have two basic ideas in mind. One (plan A) more contoured to match the windshield angle, but set back enough to not catch wind underneath. The other (plan B) would be more of a sausage cut in half. Both would have compound curves. I'm slightly concerned that if I go with plan A there might be a chance wind would catch under it and tear it off. I don't know exactly how low the airflow over the cab would be.

Plan A would seem to be more effective as it would start below the main flow of air coming off the windshield. Plan B would simply be a rounded surface instead of the current flat one. I'm game to build a mold for either and looking for ideas on how to do so. Carving foam and coating with a release material to layup fiberglass directly on the mold would seem to give me the best options for shape. Other thoughts that come to mind is building a frame with the overall shape then bending some plastic material or perhaps wacky wood to create a structure that, again, I would coat with release material and layup the glass.

In the end, I am aiming at a fiberglass construction with minimal internal frame (if any) that I could then bolt to L brackets that in turn bolt to the front of the shell.

Any thoughts on the overall shapes effectiveness Plan A, Plan B or other suggestions would be appreciated. I'd also like to draw on your experience on building a mold that would allow for the greatest flexibility of shape providing compound curves.

Finally, should this just be a deflector ala Thule deflectors that are a simple, basically flat piece of material that forces the wind up? Or an enclosed form so that it is more of an extension of the shell?

Thanks in advance for your thoughts.

View attachment 123703
Top view to show existing location of shell with relation to the cab and windshield.

View attachment 123702
Plan A is an enclosed rounded wedge, Plan B is an enclosed half-sausage.

Uncircumcised / Circumcised from my view.
:mask:
 

teejaywhy

Retired Eccentric
Skier
SkiTalk Supporter
Joined
Feb 19, 2019
Posts
1,287
Location
AZ

cantunamunch

Meh
Skier
Joined
Nov 17, 2015
Posts
22,184
Location
Lukey's boat
He says that the wind turbine he is using is cannot handle anything but driving at low speeds.

I sub to a RVer Youtuber who has experimented with setting up a wind turbine when camped. His conclusion: The size of turbine needed to produce a decent amount of electricity would be so large as to not be practical.

Same conclusion - and the reason for the truck is that he almost burned out his lathe motor before he got half the rated power out of that itsy bitsy turbine. The cheap little turbines don't even begin to live up to manufacturer claims.
 
Last edited:
Thread Starter
TS
Doug Briggs

Doug Briggs

"Douche Bag Local"
Industry Insider
SkiTalk Tester
Joined
Nov 9, 2015
Posts
7,551
Location
Breckenridge, CO
As the season for fiberglass work approaches I'm searching for ways of building the fairing for my shell. I'm going to build a mold then lay fiberglass over it. The side that is in contact with the mold will be the inside of the fairing and I'll have to fair the outside of the fairing to make it look nice.

The mold will be built on a wooden frame that is then covered in steel lath which in turn is covered with something approximating tooling dough. Epoxy tooling dough is very expensive for the surface area (10 - 15 square feet) I require so I was contemplating using plaster of paris as it is much more affordable. It can be sanded to make a pretty smooth surface to lay the fiberglass up on and a release wax applied to it prior to glassing. After the epoxy has cured from fiberglassing and I have faired the fiberglass, I'll remove the mold by pulling out the lath and plaster, destroying the mold in the process.

My reasoning for doing this is that I only need one part, I want to keep costs down and a 'perfect' finish isn't essential; I'll be content with a well faired appearance which I think I can achieve by the method I have presented.

None of this process is locked down so I encourage comments or suggestions on how to achieve the creation of the fairing with low costs and reasonable results.
 

oldschoolskier

Making fresh tracks
Skier
Joined
Dec 6, 2015
Posts
4,287
Location
Ontario Canada
As the season for fiberglass work approaches I'm searching for ways of building the fairing for my shell. I'm going to build a mold then lay fiberglass over it. The side that is in contact with the mold will be the inside of the fairing and I'll have to fair the outside of the fairing to make it look nice.

The mold will be built on a wooden frame that is then covered in steel lath which in turn is covered with something approximating tooling dough. Epoxy tooling dough is very expensive for the surface area (10 - 15 square feet) I require so I was contemplating using plaster of paris as it is much more affordable. It can be sanded to make a pretty smooth surface to lay the fiberglass up on and a release wax applied to it prior to glassing. After the epoxy has cured from fiberglassing and I have faired the fiberglass, I'll remove the mold by pulling out the lath and plaster, destroying the mold in the process.

My reasoning for doing this is that I only need one part, I want to keep costs down and a 'perfect' finish isn't essential; I'll be content with a well faired appearance which I think I can achieve by the method I have presented.

None of this process is locked down so I encourage comments or suggestions on how to achieve the creation of the fairing with low costs and reasonable results.
Might I suggest foam, carve it with a hot knife, plaster is a good idea, shellac it, wax it, lay the glass (carbon fibre) and vacuum it for best and lightest strength.

Faster, cheater, stronger.
 

cantunamunch

Meh
Skier
Joined
Nov 17, 2015
Posts
22,184
Location
Lukey's boat
Kevlar is so much better than fibreglass when it comes to canoes. How hard would it be to use that?
Both hard and expensive - and without a need for abrasion resistance or fire resistance it simply isn't justified.

S-glass is cheap, drapes well and wets out well by hand. Kevlar and most other aramids are more expensive, don't drape as nicely because most weaves don't have enough multi-directional stretch, and have lousy wet-out so the epoxy either flows off the fabric or through it, lifting the fabric off the mold. The fix for the epoxy problem is a) vacuum bag or b) face the Kevlar or Nomex with fiberglass :D.

So, since OP isn't going to vacuum bag, it would be a significant PITA for no substantive end benefit. Canoes and kayaks, ofc, need all the abrasion resistance they can possibly achieve and bagging is part of the process cost .
 
Last edited:
Thread Starter
TS
Doug Briggs

Doug Briggs

"Douche Bag Local"
Industry Insider
SkiTalk Tester
Joined
Nov 9, 2015
Posts
7,551
Location
Breckenridge, CO
As ski season (sort of) winds down, I've been returning to working on the shell.

My first task was to install a pair of bike mounts in the bed.

IMG_20210509_141750.jpg

The stick on the right that is attached with a hinge will keep the back of the mount down. A steel angle at the forward end keeps the mount from flexing to prevent two bikes from wobbling (through flexing the wood) in opposite cycles and hitting each other. The angles of the mounts permit the bars to pass each other as well as to have the bikes nested and shifted to the right, making more room in the bed.

IMG_20210509_141757.jpg

The rear wheel tie downs.

IMG_20210509_141802.jpg

The old school quick release mounts with through axle adapters. I did this because I still have bikes with quick release and already had the through axle adapters from my old Yakima mounts.

IMG_20210509_141836.jpg

The front of the mount system is attached with a plate from underneath. The wood that crosses over the top is tied down on the left as well as the right with the same type of plate underneath.

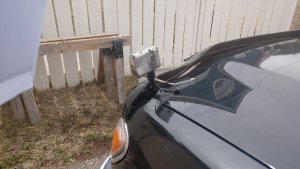
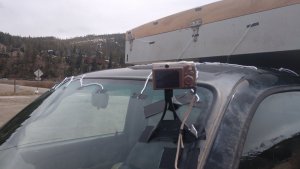
My next effort was to determine the airflow over the hood and cab. I plastered the hood and cab with telltales and drove around with a camera running video.

IMG_20210509_113136.jpg IMG_20210509_124131.jpg

IMG_20210509_113144.jpg


I added more telltales as I determined their need.


The flow over the windshield was as expected and it 'stuck' to the cab for a few inches. Then the turbulence from the front of the shell seemed to kick in and create a turbulent/dead area over the middle of the cab in front of the shell. Some flow did manage to continue under the leading part of the shell while it was quite turbulent along the top, leading edge of the shell.

I'm leaning towards building a wedge shaped fairing which continues the angle of the windshield to direct the flow over the front of the shell and taper it to match the roof line. It will cover the entire front of the shell. The leading edge of the fairing will have a gasket to allow it to contact the cab while also permitting slight shifting of the cab/shell interface. Similar, but certainly not identical to below.

1620594175262.png

An alternative is to build an elongated 'dome' that would be symmetrical. If I did this style, it would go edge to edge, unlike below.

1620594353476.png


The third possibility is to build the wedge without bringing it down to the cab.

I'm open to any thoughts you may have on this. I'm still waiting for warmer weather for glass work.
 
Last edited:
Thread Starter
TS
Doug Briggs

Doug Briggs

"Douche Bag Local"
Industry Insider
SkiTalk Tester
Joined
Nov 9, 2015
Posts
7,551
Location
Breckenridge, CO
This is a prototype for the fairing. I'm going to forego a more sophisticated fiberglass construction and simply glass and paint the thin piece of plywood and attach it to a simple commercial fairing system to a rail (INNO roof rack system) on my truck's cab. The INNO fairing has feet to protect the cab and the plywood is bolted to it using the provided mounting hardware from INNO. The 'live' fairing will be as wide as the shell but overall will look the same.

On my trip to Gypsum and back today, I got 20 mpg, which is as good mileage as I've ever gotten. So the fairing is doing its job of aerodynamics. I had been getting 16 and 17 mpg without it. The fairing will also protect the front of the shell from debris, bugs and weather.

The black rectangles on the fairing are duct tape which holds the yarn I used for evaluating airflow.

IMG_20210607_213411.jpg


IMG_20210607_213425.jpg


The position in the video is different than in the images. I'm going to keep it like in the images.
 

pete

not peace but 2 Beers!
Skier
SkiTalk Supporter
Joined
Nov 14, 2015
Posts
2,564
Location
Iowa
cool vids. you also have that space behind the fairing for luggage or small supplies
 
Thread Starter
TS
Doug Briggs

Doug Briggs

"Douche Bag Local"
Industry Insider
SkiTalk Tester
Joined
Nov 9, 2015
Posts
7,551
Location
Breckenridge, CO
@pete, I've thought of that, but there isn't room for the second bar and the space isn't that big in real life. The videos show the position before I moved the whole thing back 4 1/2 inches.
 

cantunamunch

Meh
Skier
Joined
Nov 17, 2015
Posts
22,184
Location
Lukey's boat
@pete, I've thought of that, but there isn't room for the second bar and the space isn't that big in real life. The videos show the position before I moved the whole thing back 4 1/2 inches.

Well done.

In the forward position, the videos clearly show a giant vortex behind the fairing, not what you wanted at all. Counterproductive, really.
 
Thread Starter
TS
Doug Briggs

Doug Briggs

"Douche Bag Local"
Industry Insider
SkiTalk Tester
Joined
Nov 9, 2015
Posts
7,551
Location
Breckenridge, CO
Well done.

In the forward position, the videos clearly show a giant vortex behind the fairing, not what you wanted at all. Counterproductive, really.
Thanks. I knew the first prototype was not ideal.

The forward position was 'decided' by the instructions for the mounting point provided by the rack manufacturer and the size of the piece of wood I had to prototype with. I'll also fabricate some metal triangles to support the upper part of the fairing.

I'll be adding the second bar, moving the forward bar forward a bit to accommodate the second bar and using a slightly larger sheet of plywood. I'll also add a bit to the trailing edge of the fairing that will allow a rounder transition from fairing to shell.

Fortunately, the plywood I'm using now for the fairing is 'scrap' and the wood I need for squaring/boxing in the back as mentioned elsewhere is all on hand. No trips to the yard for lumber for me.

I must say that the use of yarn and video was quite helpful as it illustrated clearly where the drag was.
 
Thread Starter
TS
Doug Briggs

Doug Briggs

"Douche Bag Local"
Industry Insider
SkiTalk Tester
Joined
Nov 9, 2015
Posts
7,551
Location
Breckenridge, CO
Talking of your new air dam - Google 'ceruse'
I've considered natural as I'm using Luann as a first attempt at a production version. My choice of material is because I have it on hand. It is slightly warped but when it is bent I'm hoping that it will not be evident. Probably, though, it'll be gray to match the shell body. I don't have any more white and don't care to dish out for it when I don't need much. Also the natural Luann wouldn't match the natural accent around the roof edge.
 

Sponsor

Top