I haven't thought much of Look Rockerace until Phil referred to them as the unicorn of bindings for having:
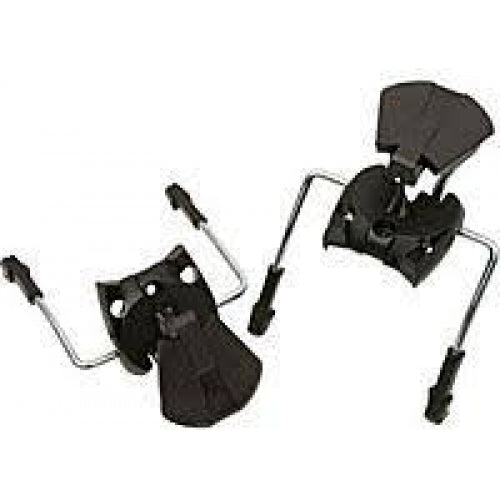
I have a pair of skis with Rockerace as well as some with SPX and I thought surely the brakes are the same, but alas, no. Here they are side by side. Very similar, but different enough that SPX brakes are incompatible with Rockerace (Rockerace on the left, SPX on the right):


But then I got to wondering, can we put SPX brake arms into the Rockerace brake? SPX comes in 90, 100, and 120 mm. If the switch can be done, then we'd gain access to those brake sizes for the Rockerace binding. Let's give it a shot!
Obviously brakes have springs. And assemblies with preloaded springs are a pain to take apart and harder to put back together. Fortunately, the engineers at Look provided a way to partially unload the spring during assembly -- and disassembly! Just put a small screwdriver in this slot and pry out the spring end:

Then do the same with the other side. When you lift it out, the two spring ends will be pointed outside of the brake carrier:

The next step is to remove the pin that holds the spring in place:

A 1/16" pin punch and hammer will do:


Once it's halfway out, grab the other end with pliers and remove:

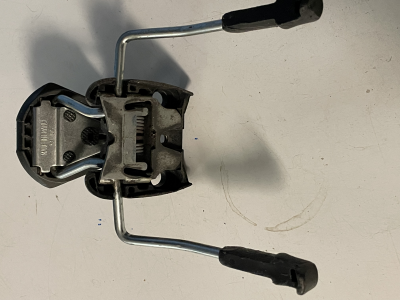
Now the parts start to come loose. Here they are:

Unfortunately the brake arms are held in place by a metal bracket, which itself is affixed to the heel platform by melted plastic tabs. Cut these tabs off with a hammer and chisel. And put on some leather gloves before you hurt yourself:

The heel platform with a tab cut free:

Now the brake arms can be pulled from the heel platform. Here are all the parts:

Now repeat this process for the other brake and the pair of donor brakes:

Once we swap brakes, we will reattach the bracket with thread forming screws. I found these screws on McMaster Carr, which requires a #27 drill bit. Set the stop on your drill press to prevent drilling through:


Swap in the new brake arms and attach the bracket:


Now for the hardest part: reassembling the spring enclosure. Get the spring properly oriented in the brake carrier. Have the spring ends in the unloaded position and insert the pin half way:


Now push the linkage arm into the spring and align it with the pin:

With some pliers, squeeze the linkage arm into place and tap the pin through. I did this by hold the pliers and bindings with both hands and hammering the pin against the edge of the workbench. Ugly, but it worked:

The pin should push through until it hits the brake carrier and housing. You somehow have to get the pin to align with these two holes and push it through. I think I used a screwdriver to hold the holes in alignment in combination with banging the pin on the workbench.
This final step takes muscle. Put the brake in a vice and push the spring ends into the brake carrier. Get the gloves on and use a strong, secure stance. Be prepared for if (when) the spring slips. Don't get hurt on this one. Once you get the spring over the edge and into the brake carrier, with a screwdriver, pry it further away from the edge for security. Do this on both sides:


Add some grease to the moving parts and your done!

Now mount these badass bindings on your favorite skis:


Look Ma! No Plates!

- a short mount distance,
- good adjustment range, and
- a lower price point.
- large elasticity (~26mm, pivots only about 2mm more)
- good adjustment hardware (worm gear)
- a metal pole cup, won't mar the bindings when stepping out
- good inboard brake retraction (they are racing bindings afterall)
- DIN options with Look's classic metal toe piece
- great colors (have you seen them in Forza and Green?)
I have a pair of skis with Rockerace as well as some with SPX and I thought surely the brakes are the same, but alas, no. Here they are side by side. Very similar, but different enough that SPX brakes are incompatible with Rockerace (Rockerace on the left, SPX on the right):
But then I got to wondering, can we put SPX brake arms into the Rockerace brake? SPX comes in 90, 100, and 120 mm. If the switch can be done, then we'd gain access to those brake sizes for the Rockerace binding. Let's give it a shot!
Obviously brakes have springs. And assemblies with preloaded springs are a pain to take apart and harder to put back together. Fortunately, the engineers at Look provided a way to partially unload the spring during assembly -- and disassembly! Just put a small screwdriver in this slot and pry out the spring end:
Then do the same with the other side. When you lift it out, the two spring ends will be pointed outside of the brake carrier:
The next step is to remove the pin that holds the spring in place:
A 1/16" pin punch and hammer will do:
Once it's halfway out, grab the other end with pliers and remove:
Now the parts start to come loose. Here they are:
Unfortunately the brake arms are held in place by a metal bracket, which itself is affixed to the heel platform by melted plastic tabs. Cut these tabs off with a hammer and chisel. And put on some leather gloves before you hurt yourself:
The heel platform with a tab cut free:
Now the brake arms can be pulled from the heel platform. Here are all the parts:
Now repeat this process for the other brake and the pair of donor brakes:
Once we swap brakes, we will reattach the bracket with thread forming screws. I found these screws on McMaster Carr, which requires a #27 drill bit. Set the stop on your drill press to prevent drilling through:
Swap in the new brake arms and attach the bracket:
Now for the hardest part: reassembling the spring enclosure. Get the spring properly oriented in the brake carrier. Have the spring ends in the unloaded position and insert the pin half way:
Now push the linkage arm into the spring and align it with the pin:
With some pliers, squeeze the linkage arm into place and tap the pin through. I did this by hold the pliers and bindings with both hands and hammering the pin against the edge of the workbench. Ugly, but it worked:
The pin should push through until it hits the brake carrier and housing. You somehow have to get the pin to align with these two holes and push it through. I think I used a screwdriver to hold the holes in alignment in combination with banging the pin on the workbench.
This final step takes muscle. Put the brake in a vice and push the spring ends into the brake carrier. Get the gloves on and use a strong, secure stance. Be prepared for if (when) the spring slips. Don't get hurt on this one. Once you get the spring over the edge and into the brake carrier, with a screwdriver, pry it further away from the edge for security. Do this on both sides:
Add some grease to the moving parts and your done!
Now mount these badass bindings on your favorite skis:
Look Ma! No Plates!


")