Due to Covid, world-wide supply chain disruptions, and you putting off buying gear until the last moment, your new skis arrived just a day before your big trip. In the middle of high season, all shops booked solid. Who's going to mount your bindings?
You are. Seriously.
If you can drive a pair of planks strapped to your feet down a friggin mountain, you have the coordination to operate a drill and cut a few well placed holes through some layers of plastic, glass, metal, and wood.
Know how to operate masking tape?
Heard of righty tighty, lefty loosy?
Ever draw circles with a compass in grade school?
Grasp the fundamentals of cutting paper with scissors?
Really. The bar is pretty low.
If you are worried you might make a mistake converting centimeters to inches or misreading a ruler throwing off the whole binding mount, rest easy: No measuring is required. In fact, binding placement for your boot BSL is precomputed into the templates so there is even less to screw up.
Carefully read through this procedure then try your hand and mounting your bindings -- first to wood 2x4s. Once your bindings are on some Douglas Firs, click in your boot and check the positions: Does the boot mid sole align with the mount line of the ski (2x4)? Are the bindings straight down the center of the ski (2x4)? Is the heel binding at the middle of its adjustment range? Then do it 3 or 4 more times. By then, mounting bindings to the real thing will be no sweat.
Why this guide?
This is the second mounting guide I've written. The first used some fun, but pricey tools. In this version we scale back to only the essentials, relying on inexpensive, commonly available tools found around town. And we also improved and simplified the procedure to maintain high accuracy. In fact, this procedure should produce results that rival any high-end shop -- and is guaranteed to be better than shops using worn out jigs and half-baked ski techs.
The first guide was written for skiers that probably have a tuning workshop where they service their gear. This guide is written for the skiers that are looking forward to the weekend and would mount bindings from their kitchen table if they could. It was motivated in part by a few threads on SkiTalk. @Frank Ricard told me he loved the first guide, but was hesitant to invest $250 in tools to get started. Assuming you have a hammer, drill, screwdriver, and scissors, tools and supplies this time around should only set you back about $30.
Or @hollyberry, an enthusiastic new member whose bindings broke, then the whole SkiTalk community rallied to help find some excellent replacements. (I think @Wendy came through with a pair of Liberty V76s.) But it was touch and go for awhile: at one point it looked like she might not find a shop to mount bindings in time for an upcoming weekend. You never know when you could be in that predicament.
So you just received your first pair of $1200 Stocklis? Come on! Let's drill some holes in those babies!
Disclaimer
Skiing has serious risks. Mounting your own bindings adds a new component to these risks. If you choose to proceed, have a qualified shop check your work and release test your bindings.
Tools and Supplies
Here's what you need:
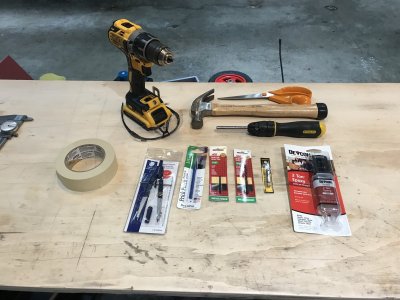
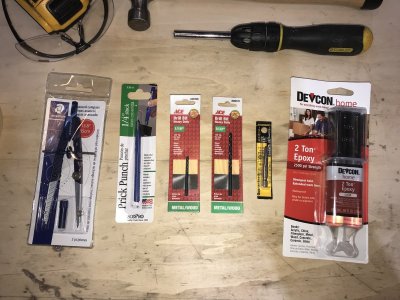
Notes on equipment:
Masking Tape
In addition to taping down paper templates, we use masking tape for marking lines on the ski: the edge of the tape becomes a reference line, such as the mount point line or the ski centerline. The straighter these lines, the higher the accuracy of the
binding mount. Wider tape "draws" straighter lines than thinner tape. I find 1 1/2" wide masking tape works well.
Compass
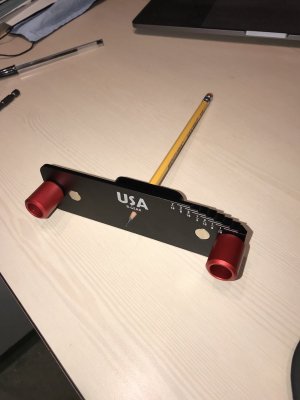
We use a compass and a construction trick from high school geometry to find the centerline of the ski. Don't skimp by buying the old friction compasses with the ball bearing we used in elementary school. Go to Office Depot/Max and spend $9 for one that has a threaded thumb wheel adjustment. Precision here translates to a high quality mount.
Prick Punch
A prick punch is used to transfer marks from the template to the ski: specifically, the locations of the holes to be drilled. Ideally, a prick punch is followed up by a center punch to prep for drilling, but since we are starting with a small pilot hole, we can forgo the center punch and save $5.
1/16" Drill Bit
Before we drill the main holes, we drill smaller holes to help guide the primary bit. These are called pilot holes. Look for heavy duty metal/wood drill bits. Stay away from anything that says "masonry" or "brad point".
5/32" Drill Bit
The official drill diameter for binding screws is 4.1 mm or 3.5 mm if your ski doesn't have a metal retention plate. But fractional metric bits are hard to find in neighborhood hardware stores. 5/32" equates to 3.96875 mm, which is close enough to either 3.5 mm or 4.1 mm for what we need. For those concerned that 5/32" is too large of a hole for 3.5 mm, we will be reinforcing the mount with high strength epoxy, going beyond the standard shop practice. Again here, look for a heavy duty metal/wood drill bit. No brad points, no masonry bits.
Epoxy
Use high strength epoxy (~2500-3500 PSI) with an extended (30 minute) handling time. Many epoxies have 5 minute handling times, which dries too fast for our work. Cure times are typically 12-24 hours.
Pozidriv #3
What appear to be Phillips screws are really a drive standard called Pozidriv. This is the hardest item to find on the list. Here in Bellingham I had no luck at Home Depot, Lowes, or Ace Hardware. I was able to find a few driver sets at Harbor Freight that included a "PZ3" bit, but they came with a bunch of other stuff I didn't want. If you have a specialty hardware store in town, this may be your best bet. I found this bit at Bellingham's "Hardware Sales" made by the company "EazyPower" and it's actually an obscure standard called Octo Driv, but it is Pozidriv compatible.
Otherwise, ski shops will have them, but you may have to buy a snowboard multi-tool to get the bit.
If none of this pans out and it comes down to a question of skiing or not skiing, use a Phillips #3. But then you must right your wrongs immediately by ordering a dedicated PZ3 driver from Binding Freedom. These screwdrivers are really comfy to hold and handle, highly recommended.
The Procedure
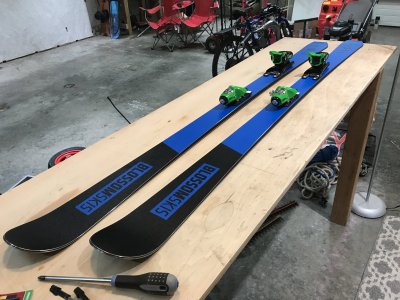
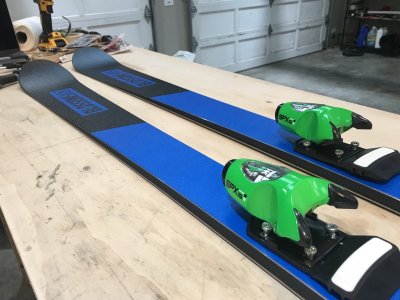
Gather up your new skis and bindings. Today I'll be mounting my new Blossom AM77s (Whiteouts!), purchased during Blossom's SkiTalk customer appreciation sale. Wow! These skis are gorgeous! And full camber is no exaggeration with these; my Rossi Hero's have deep rocker lines in comparison. @Blossom Skis really takes great care of our community here at SkiTalk. I could totally blow this mount and they'd probably send me a new pair for my efforts. ;-)
Lots of AM77 owners here mount with Vist plate and bindings. But I already have a couple of plated race skis and I wanted these to be my all-mountain, bump and fun skis for low snow days here at Mt Baker. I'm partial to Look bindings so I'll be mounting these flat with Look Rockerace SPX 15s. The Look neon green contrasts nicely with the Blossom blue!
For the templates, head over to my GitHub binding-templates project, click the directory for your bindings then select the template for your BSL. If you don't see your bindings listed, I'd be happy to work with you to get them measured up and added to the database.
BSL, by the way, stands for Boot Sole Length and is the measurement in mm from the toe edge to the heel edge and is commonly printed on the heel of the boot.
My BSL is 326 mm, so for this project, I select look-rockerace and grab the template named look-rockerace-bsl-326.svg.
If you are using Chrome, left click the template image and select "Open Image in New Tab". Go to the new tab and print, first making sure print scaling is set to 100%. Print a few copies. You will be doing a bunch of practice runs on 2x4s.
Note: These templates are driven by software and sometime software is buggy -- especially software written by me. Yet another reason to test on a 2x4 first! If you see any problems, please let me know.
I guess I lied about not having to measure anything. You need to check that the print scaling is correct. The templates have millimeter tick marks in both directions. Compare this to a ruler to make sure it agrees.
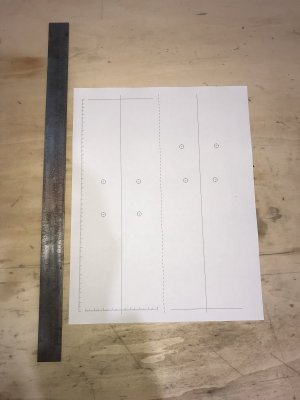
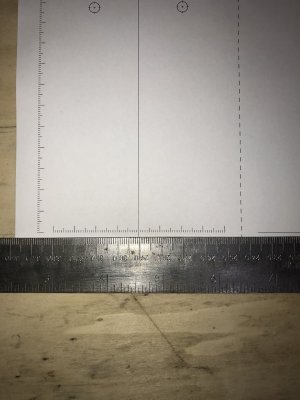
The template is printed on a single page: the left half is the heel binding, the right half is the toe binding. The two vertical lines represent the centerline of the ski and the two horizontal lines (on the top of the page on the left side and bottom of the page on the right) is the mount point line; when the boot is in the bindings, the boot mid sole line should be directly over the mount point line. These are the lines we use to align the template to the ski.
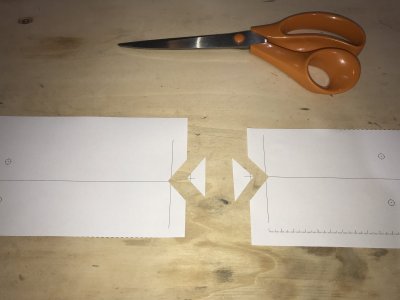
The template sheet just needs a little prep. First cut the page in half down the middle to separate the toe and heel. Then trim off a bit of paper at the ends so that the centerlines run right to the edge. Also cut a small notch where the centerlines intersect the mount point lines.
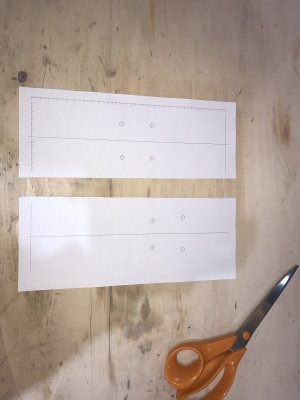
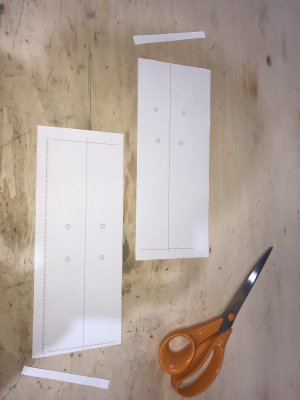
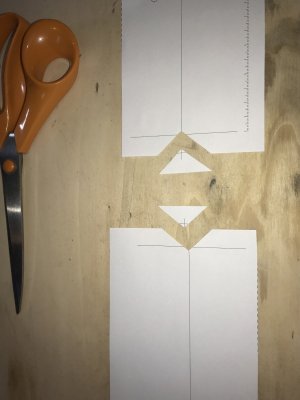
Our template is now prepped and ready to go.
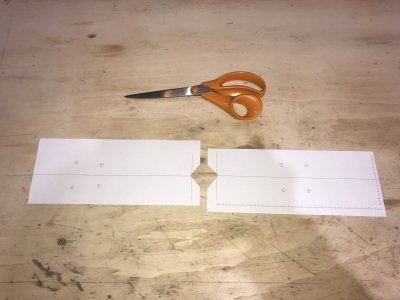
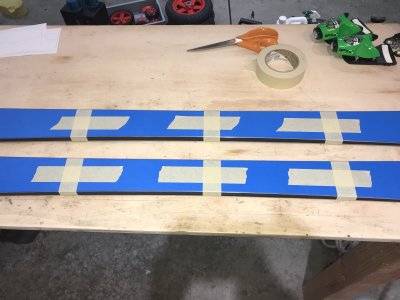
Next we start marking up the ski to align the template. First we place three pieces of tap along the centerline of the ski. Each needs to be about 6" long. One piece is centered over the mount point and the other two are centered at the expected ends of
the paper template. If you are using something other than the recommended mount point, take this into consideration when place the tape. As for me, I will be mounting "on the line".
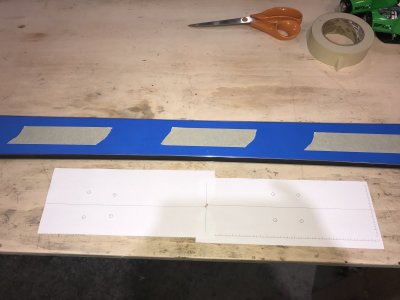
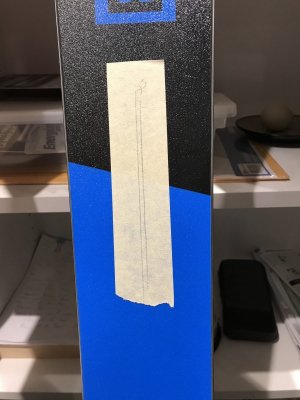
Next we mark the mount point line. For these Blossoms, it is marked in the topsheet. My convention is to use the front edge of the tape as the line and I will X out the other edge to prevent confusion. For accuracy it is important for the mount point line tape to go straight across the ski, perpendicular to the ski's centerline.
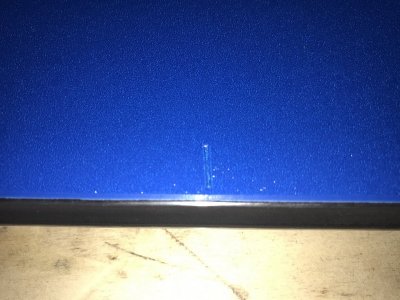
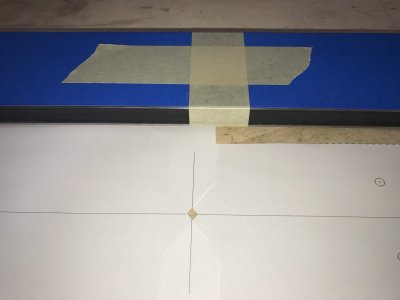
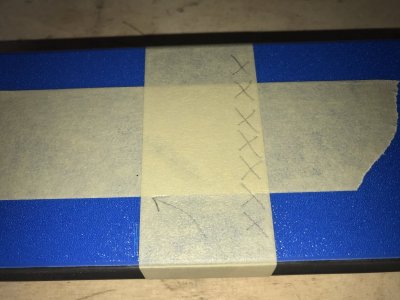
Now place tape across the ski approximately where the edge of the template is expected to rest for both toe and heel.
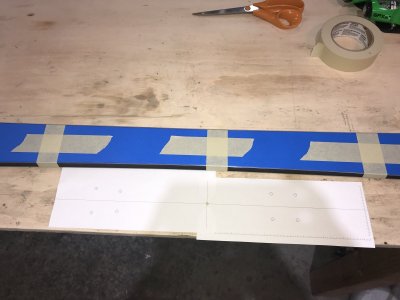
Now do the same for the other ski and compare. Put the skis base to base, decamber, and check that the mount point tape lines match.
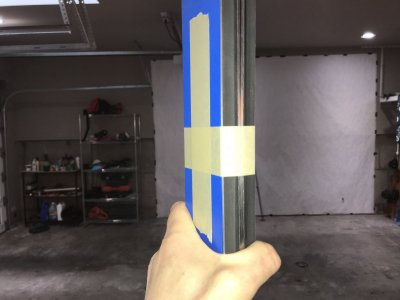
Next we mark the centerline of the ski on the three pieces of tape we first applied. Before we do this, a quick refresher on geometric constructions from high school geometry. Remember constructions? Drawing all sorts of cool stuff with nothing but a straightedge and compass?
We need to relearn how to bisect a line segment. YouTube has a ton of videos that covers this,but this one is by far the most entertaining.
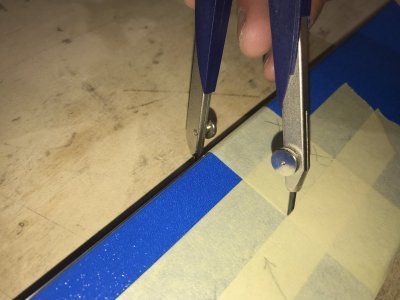
The line segments we are bisecting are the mount point line and the two other lines we taped across the ski. One complication however, is that we want the compass point placed at the ski edge, not the topsheet, and the sidewall will interfere with the compass arm.
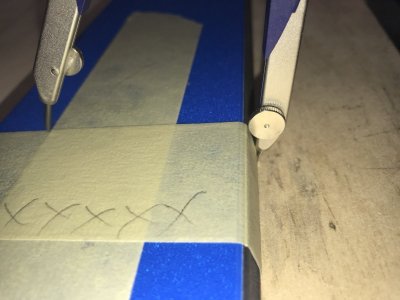
To alleviate this problem it helps to extend the pencil lead longer than the compass point and to hold the compass at a slight angle away from the ski when drawing the marks. When you are drawing the mark, make sure the sidewall is not bumping the compass arm.
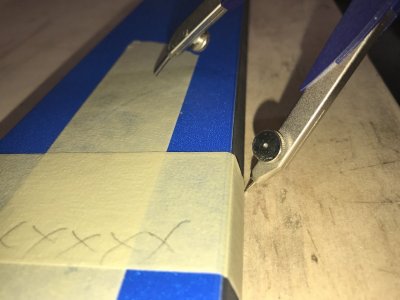
It helps to work on a wooden table so the compass point doesn't slide around. Also clamp the ski down to keep it decambed on the tabletop.
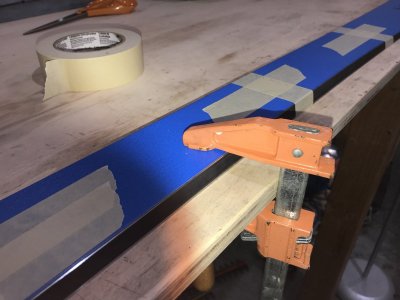
When switching between the left and right sides be sure to keep the same radius setting on the compass. We can improve accuracy by drawing multiple bisecting cross marks with different radii and then take the average of these marks when drawing the bisecting mark.
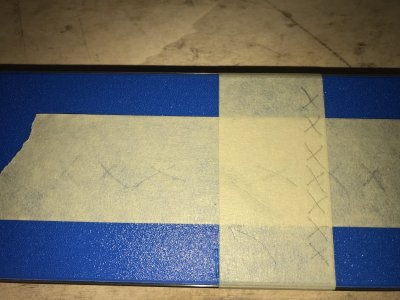
Now "draw" the bisecting mark with a piece of tape.
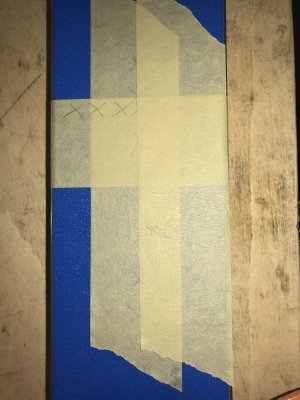
With the centerline drawn in tape, using the compass, check that it is in fact running down the middle of the ski.
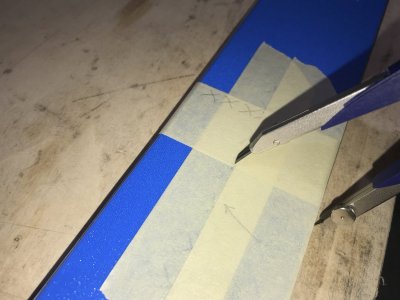
Now we are ready to place the template on the ski. Starting with the toe template, set the template aligning the mount point line and the centerlines. I find it works best to align the mount point first, lightly tape down the mount point side, then adjust the toe edge to line up with the centerline. When you are happy with the positioning, securely tape the template down.
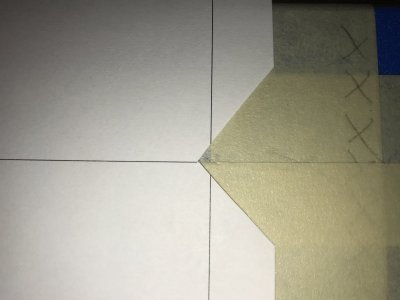
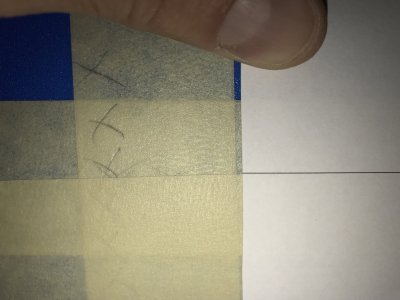
Then use the same process to align and tape down the heel template.
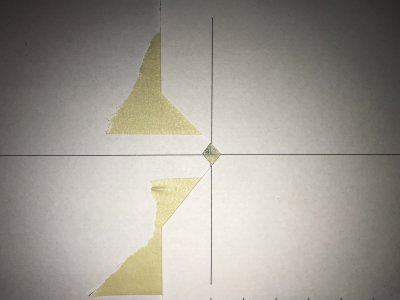
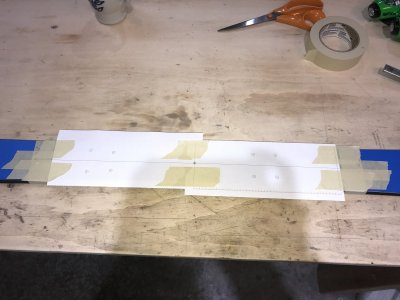
Before we use the prick punch to make hard marks in our new ski, let's step back and see if things look right. Place the bindings on the template.
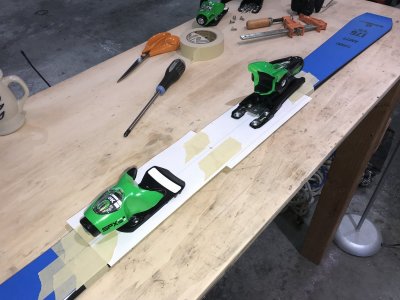
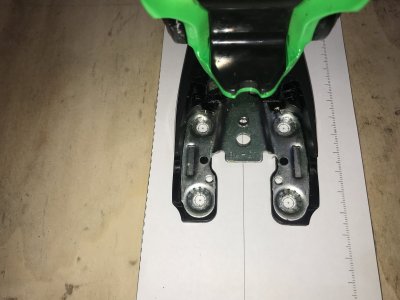
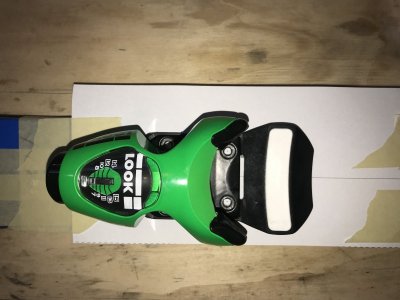
Do the holes align with the marks on the paper? Do the bindings look centered? If you imagine a boot clicked in, does the boot's mid sole line up with the mount point line?
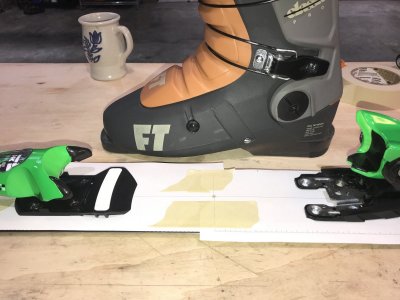
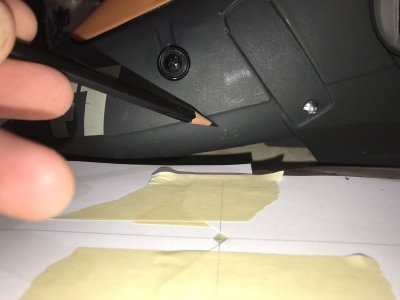
Important: Is the toe piece in front and the heel piece in back? I have to ask. It's customary to be drinking while doing this.
Lift off the bindings. Is the template secure to the ski? Is the tape holding well? Sometimes I've had tape not stick and the template shifted while I was marking holes. When you are confident everything is where is should be, place the prick punch on the first target.
Here we need to introduce the 2-view rule: When either placing a punch or drilling a hole, take views of the situation, each 90 degrees apart. In other words, look across the ski at the punch/drill and then look along the ski. What often looks good in one view, may not look good in the other.
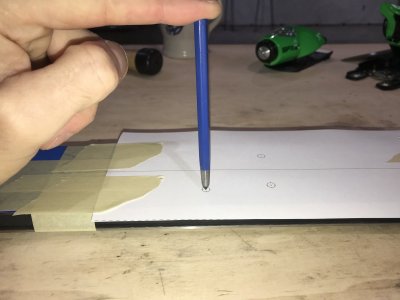
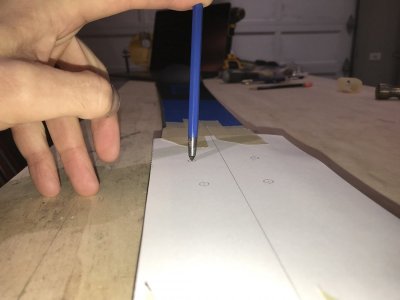
With the prick punch aligned on the target, apply a firm tap with the hammer. You don't need to pound it, we are not driving nails, just creating a small depression in the topsheet. Don't repeat tapping the same mark, just hit the punch once per mark. Repeated taps could dislodge the punch and you'll end up with lots of marks, not one.
Verify that all the holes have been punched. When you are confident every mark as been made, remove the template and all the tape.
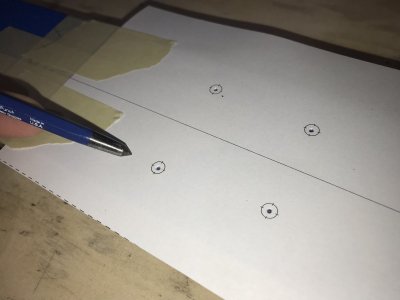
That was a lot of work just to make 8 tiny marks on our ski. But it will be worth it when it comes time to screw down our bindings. Everything will line up perfectly.
Actually, let's check that. Now is the perfect time to catch a mistake and correct it. Place the bindings on the ski. Do the punch marks look centered in the binding holes? Toes are still in front, right?
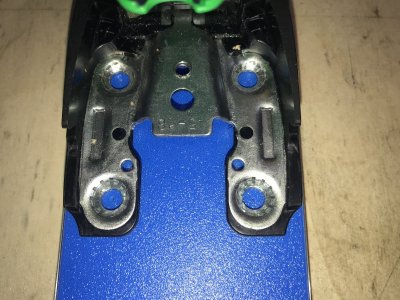
In addition to marking positions, the punch marks also serves as a drill bit guide. When starting a drill on a smooth surface, the bit will tend to wander until it cuts deep enough to stay put. But with a punch mark depression, the bit will stay in the depression as the drill spins up and starts cutting, providing an accurate hole position. The only thing more accurate than hand drilling with a punch mark is hand drilling with a pilot hole and that's why we start with a 1/16" bit.
Check that all the punch marks are deep and wide enough to hold the 1/16" bit.
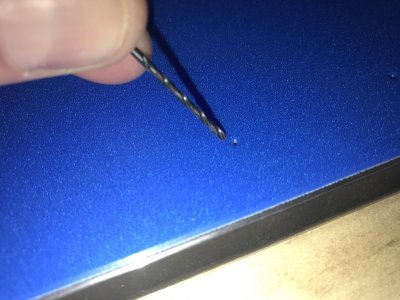
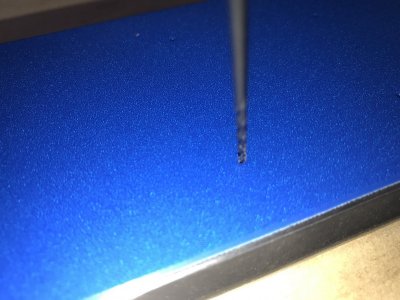
If some marks are too shallow, you can enlarge them by retapping with the prick punch. You can guide and feel the prick punch engage in a previous mark, then apply one more tap of the hammer.
Now it's time to start drilling holes.
Place masking tape on both bits to set the desired depth. Often a ski will specify a depth of 9.5 mm, but if it is less than this you should check if you need shorter binding screws to prevent screwing into the base. I don't measure exactly 9.5 mm, but instead I place the bits on the sidewall and set the tape such that the bits terminate at the metal edge: an approximate indication of where the base material is in the layup.
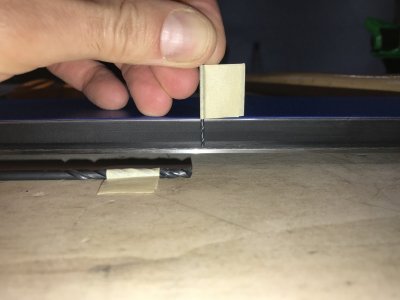
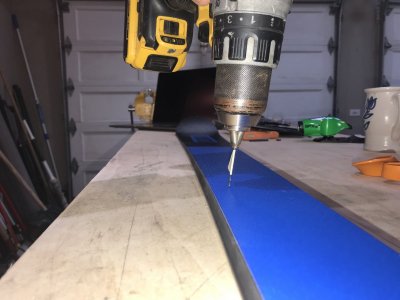
With the 1/16" pilot bit in the drill, place the bit in the first punch mark. Before drilling, ensure that the bit is vertical by using the 2-view rule: look across the ski and look along the ski. The human eye is pretty good at distinguishing when something is perpendicular, but only when it is looking at it. You may be surprised on how easy it is to not drill straight. What looks great from the side, can look horrible along the other axis.
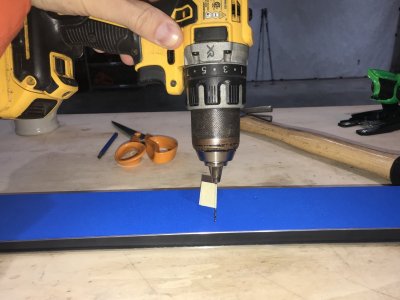
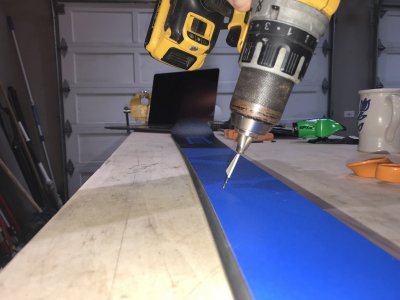
Alternate between the 2 views a few times and get accustomed to the correct drill position for a near-perfect vertical hole.
For hand drilling, the key to success is to use sharp drill bits, slow to medium drilling speeds, a light downward pressure, and to take your time. If your arms get tired between holes, take a break, don't push it. Periodically check that you are holding the drill vertical using the 2-view rule.
The hardest part is drilling through the metal top layer. Some skis are harder than others. Liberty's steel binding retention plates can be pretty challenging. If you go to fast or push to hard you risk punching through and drilling into and possible through the base of the ski. If you feel you are pushing too hard and not making progress, your drill bit is probably dull. Change it for a new one.
Try to anticipate when the drill is getting close to breaching the top layer and be ready to get off the gas. After you are through the top layer, continue slowing drilling through the core to reach the desired depth marked by the tape.
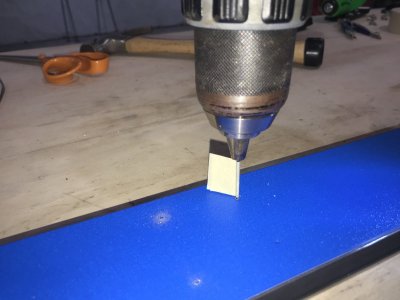
After each hole, check that the tape still marks the correct depth. Sometimes the tape will get pushed up the bit.
If you do accidentally drill through the ski, don't be hard on yourself. The hole is easily patched with a ptex candle and it will make no difference in ski performance, though your friends will make fun of you. Here's an idea: offer to mount their bindings and practice on their skis first. It is better to drill through the ski than to not drill the hole deep enough as the later can cause the base to bulge and possibly delaminate when the binding screw is tightened down.
After all the pilot holes are drilled, switch to the 5/32" primary bit and repeat. Before starting each hole, ensure the primary bit is seated in the pilot hole. Use a light grip and let the pilot hole guide the drill. Don't try to steer it yourself.
Aside: I use this same method when I drill skis on a drill press. When drilling the primary hole, invariably the ski is not perfectly aligned with the drill spindle. But it doesn't matter. As soon as the bit makes contact with the pilot hole, the imbalance of force on the ski is enough to cause the whole ski to shift on the drill press table into perfect alignment. In short: Trust the pilot hole.
If you still don't believe me, here's a picture of the progress shortly after starting the primary bit. See how the pilot hole is perfectly in the middle of the outer hole? And this was drilled by hand, no drill press involved.
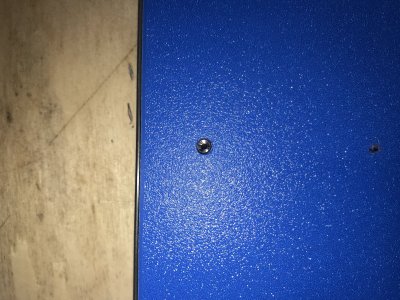
Bear in mind that the larger diameter bit will have a tendency to grab and dive more when it breeches the top metal layer. If possible, use even more caution here as you approach the point of breaking through.
Again, drill each hole to depth and frequently recheck the depth setting of the tape. Take breaks if you need it. Don't rush.
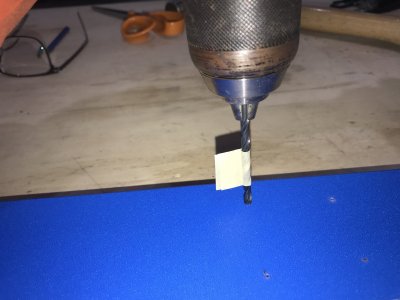
All holes drilled? Nice job! Flip the ski over and tap out the chips. The holes need to be clean of debris.
As a little celebration, place the bindings on the ski and check out that hole alignment. I hope you are as stoked as I am.
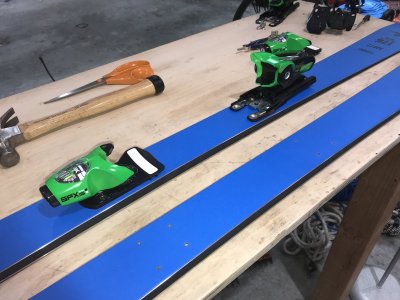
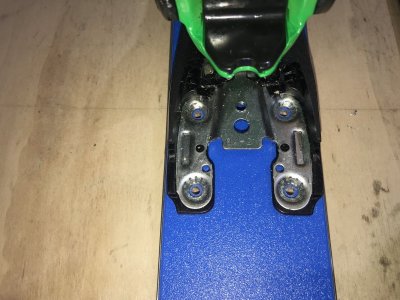
The hardest part is over, but the riskiest part is now upon us. The greatest chance for a mount failure is not a mis-drilled hole, but a hole that gets stripped out. We call this volcanoing: a screw that should cleanly descending into the core of the ski, instead stays near
the surface and the threads become augers that and pulls material up from below. The best way to prevent a volcano is to cut threads with a tap.
Clean, precut threads also prevent stripping from over tightening. If we are forming the threads as we are mounting the bindings, it is hard to tell if the increased torque on the screwdriver is because we are forming new threads or if the binding is beginning to seat. If it is the later and we continue tightening, there is a good chance we will strip out the hole. If however, the threads are preformed, we know any significant increase in torque is due to the binding seating and can stop tightening.
Though a tap is recommend, it is not necessary. We can preform the threads using a binding screw. Place some tape on the binding screw to mark the desired depth, like with did with the drill bits, but this time don't go as deep, use a shallower depth. We don't want to dimple the base material.
Volcanoing is due to not applying enough downward force on the screw as it is driven in. Ensure the screw is straight as you apply a hard downward force with each twist of the screwdriver. You can't put too much weight on the screw. I lean onto the screwdriver with one hand and a shoulder and twist the screwdriver with the other hand.
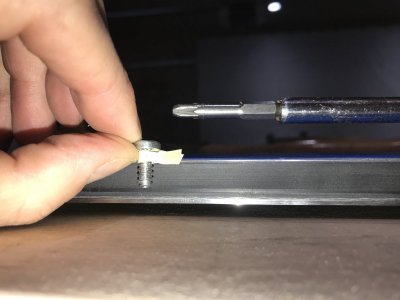
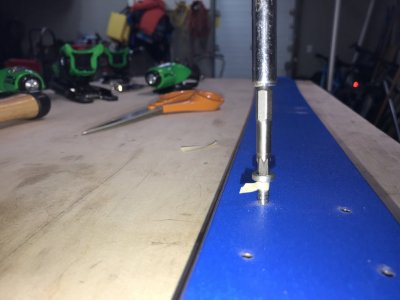
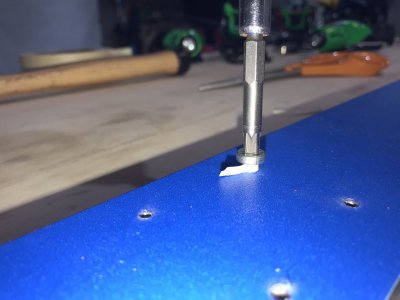
Once you've hit the marked depth, back out the screw inspect the threads. Do they look clean? Screw the screw back in, but this time only using firm downward pressure. The screw should pick up on the formed threads and get pulled into the hole. Note what this feels like. This is what the thread engagement should feel like when we are mounting the bindings. Always remember to keep the screw straight and assist it with a firm downward force. Cross threading, i.e. a screw going in crooked will damage the hole.
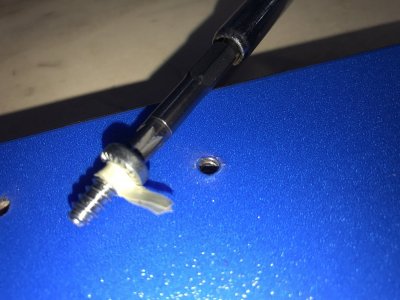
After forming threads in all the holes, mix up some epoxy, dab a drop into each hole, and wipe away the excess, one ski at a time.
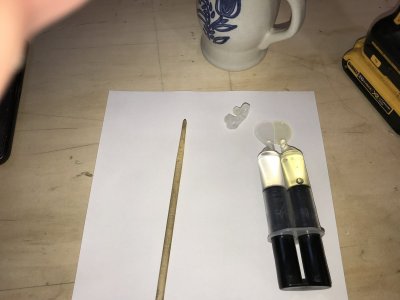
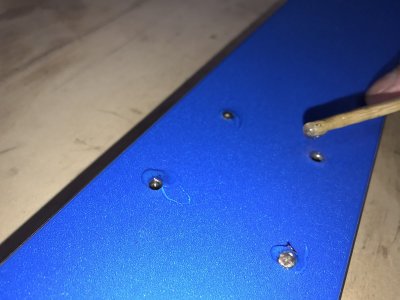
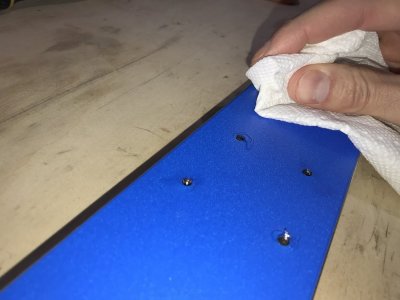
Now place the bindings over the holes and lightly start all the screws. Don't tighten anything down until all the screws are cleanly engaged in the preformed threads. Then slowly tighten all screw simultaneously, like putting lug nuts on a wheel.
Watch from the side for the binding to seat against the surface of the ski and anticipate a torque increase in the screwdriver.
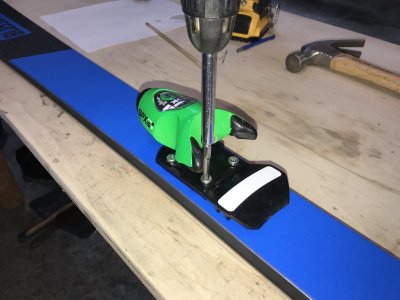
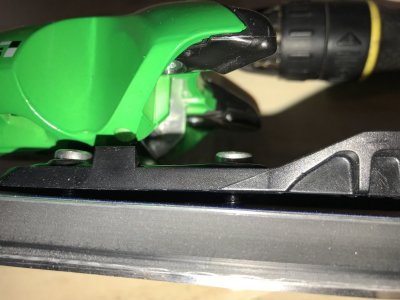
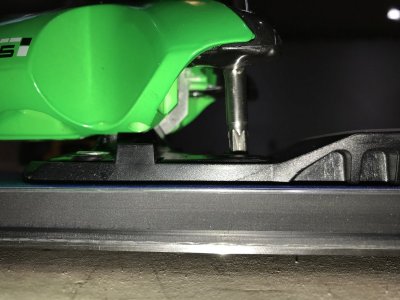
Do not over tighten. When the binding seats, given each screw another 1/8 to a 1/4 of a turn. Remember, over tightening a screw does not increase it's holding strength, it weakens it.
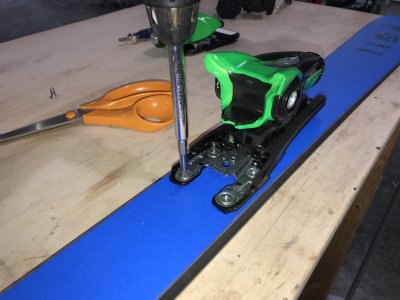
Both bindings successfully mounted? Congratulations! Your skis are good to go -- that is, good to go to the shop for binding setting and release testing.
Thanks for your time. I hope you enjoyed reading this guide and that it motivates you to consider mounting your own bindings in the future.
Don't hesitate with any questions. Myself or any of the vast number of authorities here at SkiTalk would be glad to offer any help or advice.
Now let the mount pics come forth! Show me Pivots bolted to 2x4s!


You are. Seriously.
If you can drive a pair of planks strapped to your feet down a friggin mountain, you have the coordination to operate a drill and cut a few well placed holes through some layers of plastic, glass, metal, and wood.
Know how to operate masking tape?
Heard of righty tighty, lefty loosy?
Ever draw circles with a compass in grade school?
Grasp the fundamentals of cutting paper with scissors?
Really. The bar is pretty low.
If you are worried you might make a mistake converting centimeters to inches or misreading a ruler throwing off the whole binding mount, rest easy: No measuring is required. In fact, binding placement for your boot BSL is precomputed into the templates so there is even less to screw up.
Carefully read through this procedure then try your hand and mounting your bindings -- first to wood 2x4s. Once your bindings are on some Douglas Firs, click in your boot and check the positions: Does the boot mid sole align with the mount line of the ski (2x4)? Are the bindings straight down the center of the ski (2x4)? Is the heel binding at the middle of its adjustment range? Then do it 3 or 4 more times. By then, mounting bindings to the real thing will be no sweat.
Why this guide?
This is the second mounting guide I've written. The first used some fun, but pricey tools. In this version we scale back to only the essentials, relying on inexpensive, commonly available tools found around town. And we also improved and simplified the procedure to maintain high accuracy. In fact, this procedure should produce results that rival any high-end shop -- and is guaranteed to be better than shops using worn out jigs and half-baked ski techs.
The first guide was written for skiers that probably have a tuning workshop where they service their gear. This guide is written for the skiers that are looking forward to the weekend and would mount bindings from their kitchen table if they could. It was motivated in part by a few threads on SkiTalk. @Frank Ricard told me he loved the first guide, but was hesitant to invest $250 in tools to get started. Assuming you have a hammer, drill, screwdriver, and scissors, tools and supplies this time around should only set you back about $30.
Or @hollyberry, an enthusiastic new member whose bindings broke, then the whole SkiTalk community rallied to help find some excellent replacements. (I think @Wendy came through with a pair of Liberty V76s.) But it was touch and go for awhile: at one point it looked like she might not find a shop to mount bindings in time for an upcoming weekend. You never know when you could be in that predicament.
So you just received your first pair of $1200 Stocklis? Come on! Let's drill some holes in those babies!
Disclaimer
Skiing has serious risks. Mounting your own bindings adds a new component to these risks. If you choose to proceed, have a qualified shop check your work and release test your bindings.
Tools and Supplies
Here's what you need:
- Safety Glasses
- Drill
- Hammer
- Clamp
- Multi Bit Screwdriver
- Scissors
- Masking Tape
- Compass ($9)
- Prick Punch ($5)
- 1/16" Drill Bit ($2)
- 5/32" Drill Bit ($2)
- Epoxy ($7)
- Pozidriv #3 Bit ($3)


Notes on equipment:
Masking Tape
In addition to taping down paper templates, we use masking tape for marking lines on the ski: the edge of the tape becomes a reference line, such as the mount point line or the ski centerline. The straighter these lines, the higher the accuracy of the
binding mount. Wider tape "draws" straighter lines than thinner tape. I find 1 1/2" wide masking tape works well.
Compass
We use a compass and a construction trick from high school geometry to find the centerline of the ski. Don't skimp by buying the old friction compasses with the ball bearing we used in elementary school. Go to Office Depot/Max and spend $9 for one that has a threaded thumb wheel adjustment. Precision here translates to a high quality mount.
Prick Punch
A prick punch is used to transfer marks from the template to the ski: specifically, the locations of the holes to be drilled. Ideally, a prick punch is followed up by a center punch to prep for drilling, but since we are starting with a small pilot hole, we can forgo the center punch and save $5.
1/16" Drill Bit
Before we drill the main holes, we drill smaller holes to help guide the primary bit. These are called pilot holes. Look for heavy duty metal/wood drill bits. Stay away from anything that says "masonry" or "brad point".
5/32" Drill Bit
The official drill diameter for binding screws is 4.1 mm or 3.5 mm if your ski doesn't have a metal retention plate. But fractional metric bits are hard to find in neighborhood hardware stores. 5/32" equates to 3.96875 mm, which is close enough to either 3.5 mm or 4.1 mm for what we need. For those concerned that 5/32" is too large of a hole for 3.5 mm, we will be reinforcing the mount with high strength epoxy, going beyond the standard shop practice. Again here, look for a heavy duty metal/wood drill bit. No brad points, no masonry bits.
Epoxy
Use high strength epoxy (~2500-3500 PSI) with an extended (30 minute) handling time. Many epoxies have 5 minute handling times, which dries too fast for our work. Cure times are typically 12-24 hours.
Pozidriv #3
What appear to be Phillips screws are really a drive standard called Pozidriv. This is the hardest item to find on the list. Here in Bellingham I had no luck at Home Depot, Lowes, or Ace Hardware. I was able to find a few driver sets at Harbor Freight that included a "PZ3" bit, but they came with a bunch of other stuff I didn't want. If you have a specialty hardware store in town, this may be your best bet. I found this bit at Bellingham's "Hardware Sales" made by the company "EazyPower" and it's actually an obscure standard called Octo Driv, but it is Pozidriv compatible.
Otherwise, ski shops will have them, but you may have to buy a snowboard multi-tool to get the bit.
If none of this pans out and it comes down to a question of skiing or not skiing, use a Phillips #3. But then you must right your wrongs immediately by ordering a dedicated PZ3 driver from Binding Freedom. These screwdrivers are really comfy to hold and handle, highly recommended.
The Procedure
Gather up your new skis and bindings. Today I'll be mounting my new Blossom AM77s (Whiteouts!), purchased during Blossom's SkiTalk customer appreciation sale. Wow! These skis are gorgeous! And full camber is no exaggeration with these; my Rossi Hero's have deep rocker lines in comparison. @Blossom Skis really takes great care of our community here at SkiTalk. I could totally blow this mount and they'd probably send me a new pair for my efforts. ;-)
Lots of AM77 owners here mount with Vist plate and bindings. But I already have a couple of plated race skis and I wanted these to be my all-mountain, bump and fun skis for low snow days here at Mt Baker. I'm partial to Look bindings so I'll be mounting these flat with Look Rockerace SPX 15s. The Look neon green contrasts nicely with the Blossom blue!


For the templates, head over to my GitHub binding-templates project, click the directory for your bindings then select the template for your BSL. If you don't see your bindings listed, I'd be happy to work with you to get them measured up and added to the database.
BSL, by the way, stands for Boot Sole Length and is the measurement in mm from the toe edge to the heel edge and is commonly printed on the heel of the boot.
My BSL is 326 mm, so for this project, I select look-rockerace and grab the template named look-rockerace-bsl-326.svg.
If you are using Chrome, left click the template image and select "Open Image in New Tab". Go to the new tab and print, first making sure print scaling is set to 100%. Print a few copies. You will be doing a bunch of practice runs on 2x4s.
Note: These templates are driven by software and sometime software is buggy -- especially software written by me. Yet another reason to test on a 2x4 first! If you see any problems, please let me know.
I guess I lied about not having to measure anything. You need to check that the print scaling is correct. The templates have millimeter tick marks in both directions. Compare this to a ruler to make sure it agrees.


The template is printed on a single page: the left half is the heel binding, the right half is the toe binding. The two vertical lines represent the centerline of the ski and the two horizontal lines (on the top of the page on the left side and bottom of the page on the right) is the mount point line; when the boot is in the bindings, the boot mid sole line should be directly over the mount point line. These are the lines we use to align the template to the ski.
The template sheet just needs a little prep. First cut the page in half down the middle to separate the toe and heel. Then trim off a bit of paper at the ends so that the centerlines run right to the edge. Also cut a small notch where the centerlines intersect the mount point lines.


Our template is now prepped and ready to go.

Next we start marking up the ski to align the template. First we place three pieces of tap along the centerline of the ski. Each needs to be about 6" long. One piece is centered over the mount point and the other two are centered at the expected ends of
the paper template. If you are using something other than the recommended mount point, take this into consideration when place the tape. As for me, I will be mounting "on the line".

Next we mark the mount point line. For these Blossoms, it is marked in the topsheet. My convention is to use the front edge of the tape as the line and I will X out the other edge to prevent confusion. For accuracy it is important for the mount point line tape to go straight across the ski, perpendicular to the ski's centerline.


Now place tape across the ski approximately where the edge of the template is expected to rest for both toe and heel.

Now do the same for the other ski and compare. Put the skis base to base, decamber, and check that the mount point tape lines match.

Next we mark the centerline of the ski on the three pieces of tape we first applied. Before we do this, a quick refresher on geometric constructions from high school geometry. Remember constructions? Drawing all sorts of cool stuff with nothing but a straightedge and compass?
We need to relearn how to bisect a line segment. YouTube has a ton of videos that covers this,but this one is by far the most entertaining.
The line segments we are bisecting are the mount point line and the two other lines we taped across the ski. One complication however, is that we want the compass point placed at the ski edge, not the topsheet, and the sidewall will interfere with the compass arm.

To alleviate this problem it helps to extend the pencil lead longer than the compass point and to hold the compass at a slight angle away from the ski when drawing the marks. When you are drawing the mark, make sure the sidewall is not bumping the compass arm.

It helps to work on a wooden table so the compass point doesn't slide around. Also clamp the ski down to keep it decambed on the tabletop.

When switching between the left and right sides be sure to keep the same radius setting on the compass. We can improve accuracy by drawing multiple bisecting cross marks with different radii and then take the average of these marks when drawing the bisecting mark.

Now "draw" the bisecting mark with a piece of tape.

With the centerline drawn in tape, using the compass, check that it is in fact running down the middle of the ski.


Now we are ready to place the template on the ski. Starting with the toe template, set the template aligning the mount point line and the centerlines. I find it works best to align the mount point first, lightly tape down the mount point side, then adjust the toe edge to line up with the centerline. When you are happy with the positioning, securely tape the template down.


Then use the same process to align and tape down the heel template.


Before we use the prick punch to make hard marks in our new ski, let's step back and see if things look right. Place the bindings on the template.


Do the holes align with the marks on the paper? Do the bindings look centered? If you imagine a boot clicked in, does the boot's mid sole line up with the mount point line?


Important: Is the toe piece in front and the heel piece in back? I have to ask. It's customary to be drinking while doing this.
Lift off the bindings. Is the template secure to the ski? Is the tape holding well? Sometimes I've had tape not stick and the template shifted while I was marking holes. When you are confident everything is where is should be, place the prick punch on the first target.
Here we need to introduce the 2-view rule: When either placing a punch or drilling a hole, take views of the situation, each 90 degrees apart. In other words, look across the ski at the punch/drill and then look along the ski. What often looks good in one view, may not look good in the other.


With the prick punch aligned on the target, apply a firm tap with the hammer. You don't need to pound it, we are not driving nails, just creating a small depression in the topsheet. Don't repeat tapping the same mark, just hit the punch once per mark. Repeated taps could dislodge the punch and you'll end up with lots of marks, not one.
Verify that all the holes have been punched. When you are confident every mark as been made, remove the template and all the tape.

That was a lot of work just to make 8 tiny marks on our ski. But it will be worth it when it comes time to screw down our bindings. Everything will line up perfectly.
Actually, let's check that. Now is the perfect time to catch a mistake and correct it. Place the bindings on the ski. Do the punch marks look centered in the binding holes? Toes are still in front, right?

In addition to marking positions, the punch marks also serves as a drill bit guide. When starting a drill on a smooth surface, the bit will tend to wander until it cuts deep enough to stay put. But with a punch mark depression, the bit will stay in the depression as the drill spins up and starts cutting, providing an accurate hole position. The only thing more accurate than hand drilling with a punch mark is hand drilling with a pilot hole and that's why we start with a 1/16" bit.
Check that all the punch marks are deep and wide enough to hold the 1/16" bit.


If some marks are too shallow, you can enlarge them by retapping with the prick punch. You can guide and feel the prick punch engage in a previous mark, then apply one more tap of the hammer.
Now it's time to start drilling holes.
Place masking tape on both bits to set the desired depth. Often a ski will specify a depth of 9.5 mm, but if it is less than this you should check if you need shorter binding screws to prevent screwing into the base. I don't measure exactly 9.5 mm, but instead I place the bits on the sidewall and set the tape such that the bits terminate at the metal edge: an approximate indication of where the base material is in the layup.

With the 1/16" pilot bit in the drill, place the bit in the first punch mark. Before drilling, ensure that the bit is vertical by using the 2-view rule: look across the ski and look along the ski. The human eye is pretty good at distinguishing when something is perpendicular, but only when it is looking at it. You may be surprised on how easy it is to not drill straight. What looks great from the side, can look horrible along the other axis.


Alternate between the 2 views a few times and get accustomed to the correct drill position for a near-perfect vertical hole.
For hand drilling, the key to success is to use sharp drill bits, slow to medium drilling speeds, a light downward pressure, and to take your time. If your arms get tired between holes, take a break, don't push it. Periodically check that you are holding the drill vertical using the 2-view rule.
The hardest part is drilling through the metal top layer. Some skis are harder than others. Liberty's steel binding retention plates can be pretty challenging. If you go to fast or push to hard you risk punching through and drilling into and possible through the base of the ski. If you feel you are pushing too hard and not making progress, your drill bit is probably dull. Change it for a new one.
Try to anticipate when the drill is getting close to breaching the top layer and be ready to get off the gas. After you are through the top layer, continue slowing drilling through the core to reach the desired depth marked by the tape.

After each hole, check that the tape still marks the correct depth. Sometimes the tape will get pushed up the bit.
If you do accidentally drill through the ski, don't be hard on yourself. The hole is easily patched with a ptex candle and it will make no difference in ski performance, though your friends will make fun of you. Here's an idea: offer to mount their bindings and practice on their skis first. It is better to drill through the ski than to not drill the hole deep enough as the later can cause the base to bulge and possibly delaminate when the binding screw is tightened down.
After all the pilot holes are drilled, switch to the 5/32" primary bit and repeat. Before starting each hole, ensure the primary bit is seated in the pilot hole. Use a light grip and let the pilot hole guide the drill. Don't try to steer it yourself.
Aside: I use this same method when I drill skis on a drill press. When drilling the primary hole, invariably the ski is not perfectly aligned with the drill spindle. But it doesn't matter. As soon as the bit makes contact with the pilot hole, the imbalance of force on the ski is enough to cause the whole ski to shift on the drill press table into perfect alignment. In short: Trust the pilot hole.
If you still don't believe me, here's a picture of the progress shortly after starting the primary bit. See how the pilot hole is perfectly in the middle of the outer hole? And this was drilled by hand, no drill press involved.

Bear in mind that the larger diameter bit will have a tendency to grab and dive more when it breeches the top metal layer. If possible, use even more caution here as you approach the point of breaking through.
Again, drill each hole to depth and frequently recheck the depth setting of the tape. Take breaks if you need it. Don't rush.

All holes drilled? Nice job! Flip the ski over and tap out the chips. The holes need to be clean of debris.
As a little celebration, place the bindings on the ski and check out that hole alignment. I hope you are as stoked as I am.


The hardest part is over, but the riskiest part is now upon us. The greatest chance for a mount failure is not a mis-drilled hole, but a hole that gets stripped out. We call this volcanoing: a screw that should cleanly descending into the core of the ski, instead stays near
the surface and the threads become augers that and pulls material up from below. The best way to prevent a volcano is to cut threads with a tap.
Clean, precut threads also prevent stripping from over tightening. If we are forming the threads as we are mounting the bindings, it is hard to tell if the increased torque on the screwdriver is because we are forming new threads or if the binding is beginning to seat. If it is the later and we continue tightening, there is a good chance we will strip out the hole. If however, the threads are preformed, we know any significant increase in torque is due to the binding seating and can stop tightening.
Though a tap is recommend, it is not necessary. We can preform the threads using a binding screw. Place some tape on the binding screw to mark the desired depth, like with did with the drill bits, but this time don't go as deep, use a shallower depth. We don't want to dimple the base material.
Volcanoing is due to not applying enough downward force on the screw as it is driven in. Ensure the screw is straight as you apply a hard downward force with each twist of the screwdriver. You can't put too much weight on the screw. I lean onto the screwdriver with one hand and a shoulder and twist the screwdriver with the other hand.


Once you've hit the marked depth, back out the screw inspect the threads. Do they look clean? Screw the screw back in, but this time only using firm downward pressure. The screw should pick up on the formed threads and get pulled into the hole. Note what this feels like. This is what the thread engagement should feel like when we are mounting the bindings. Always remember to keep the screw straight and assist it with a firm downward force. Cross threading, i.e. a screw going in crooked will damage the hole.

After forming threads in all the holes, mix up some epoxy, dab a drop into each hole, and wipe away the excess, one ski at a time.


Now place the bindings over the holes and lightly start all the screws. Don't tighten anything down until all the screws are cleanly engaged in the preformed threads. Then slowly tighten all screw simultaneously, like putting lug nuts on a wheel.
Watch from the side for the binding to seat against the surface of the ski and anticipate a torque increase in the screwdriver.


Do not over tighten. When the binding seats, given each screw another 1/8 to a 1/4 of a turn. Remember, over tightening a screw does not increase it's holding strength, it weakens it.

Both bindings successfully mounted? Congratulations! Your skis are good to go -- that is, good to go to the shop for binding setting and release testing.
Thanks for your time. I hope you enjoyed reading this guide and that it motivates you to consider mounting your own bindings in the future.
Don't hesitate with any questions. Myself or any of the vast number of authorities here at SkiTalk would be glad to offer any help or advice.
Now let the mount pics come forth! Show me Pivots bolted to 2x4s!
Attachments
Last edited:


