


Here's a slideshow outlining how I mount bindings with paper templates. I'm not a ski tech so don't take this as a definitive how-to; it's just a procedure that has worked well for me. There's always room for improvement, so if you have suggestions, please offer them up. I like the procedure because there is no measurement involved -- aside from marking the 9.5mm depth on the drill bits. I find it yields a high degree of accuracy: the printer is probably the greatest source of error in the process. As I go through the steps I'll add links to the various tools I find helpful.
If you are considering mounting your own bindings, please be aware of the risk you are undertaking. I recommend practicing several mounts on 2x4s before drilling into the real thing. It's also advisable to take the finished product into the shop for mount and setting verification.
I have used other available templates with success, but I decided to create my own, mostly for the fun of it, but also because I have found it difficult to cut templates to the right boot sole length (BSL) and join the templates together with good alignment. For this reason, I wrote a program to compute hole locations given a binding and BSL, while aligning the two pages is made easier with thin alignment marks that span the full page ensuring a straight template centerline. I also print two templates per set since center punching is destructive. The templates are available on my github. If you don't mind some Haskell programming you can also use the program to do things like compare holes locations of varying bindings, BSLs, and mount points, in case you are considering the optimal placement for a remount:

 github.com
For this slideshow I'm mounting a pair of Marker Griffons set at 334mm BSL. Here is the corresponding template:
 github.com
And here it is printed out. Be sure to check correct printer scaling:

First trim of the corners of one page right through the two alignment marks:

This allow one page to be aligned with the other:

When you're satisfied, carefully tape together, front and back:

The final template prep requires cutting see-through holes at the intersections of the centerlines and the midsole line. We also need to trim the ends so that the centerlines run right to the edge of the paper:

Now get some skis to mount. I came across a brand new pair of 2016 (?) Head Monster 88s still in plastic being sold out of a scuba shop in Tennessee.
(Dear Head, Please bring back the Monster, preferably with the classic non-hammerhead tip. It's one of the best of all time.)

Skis mark the suggested mount point in various ways. These Monsters had it on the sidewall:

Mark you desired mount point with masking tape. I put Xs on one edge so I don't confuse the right edge with the wrong:

Place the template on the skis with the mount point aligned with the midsole line, view through the holes:


Now place 3-4 layers of tape on the approximate ski centerline where the template edges land. The extra layers of tape prevent the marking gauge from cutting through and defacing your new pair of skis:

Mark on the tap where the template edge lands:

Using a marking gauge, find the center of the ski, repeatedly checking one side and then the other, closing in on the center. I recommend this marking gauge from Lee Valley Tools:

Once you have the center, mark the tape using both ski edges. If you have a short turn radius ski, this mark should look like an squashed X, which is okay. With these Monsters (184), it's pretty much a straight line:

Now align the template on the ski using the front centerline mark, the rear centerline mark, and the midsole / mount point mark:


Carefully tape the template to the ski. Tape down the see-through hole for better security:

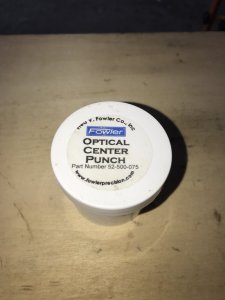
Now it is time to center punch. I highly recommend getting an optical center punch: they provide good accuracy and they make you feel like a submarine captain peering through a periscope. I use this one by Fowler:

Target in sight:

Target acquired!

Fire! (Replace the optical eyepiece with the punch and wack it with a hammer.):

All marks punched:

Remove all the templates and tape:


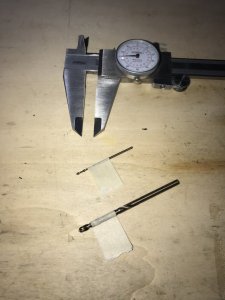
Center punching is more than just marks. It dimples the surface allowing a drill bit to find the hole center without wandering. I use a 1/16" bit as a pilot hole:

The main bit is 5/32", which is just under the standard 4.1mm and still large enough to be tapped. Mark the correct depth on the bits with tape; in this case, 9.5 mm:

Until recently I have hand drilled the pilot and main holes. However, I just got this mini drill press to make the work easier. It's from Grizzly, but it is a Chinese make found under a number of different brands:

 www.grizzly.com

Set the correct depth for the pilot holes:

Drill the pilots. Unlike with a hand drill, I've found that the drill press takes more effort to get good alignment, but once you do, it's much easier to drill:

Next set the depth with the main bit and drill. If the ski can slide freely on the table surface, the main bit will automatically find and align with the pilot hole:

Holes drilled!

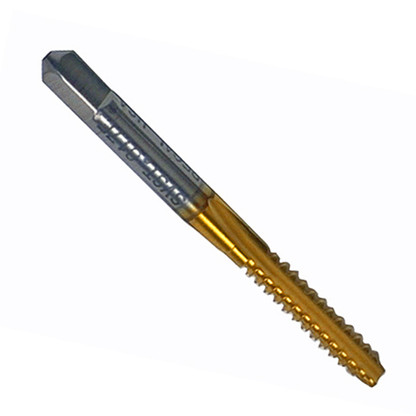
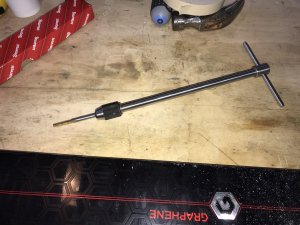
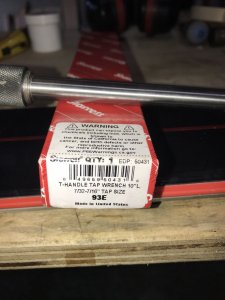
Hole tapping next. I use a tap from Binding Freedom and a long tap wrench from Starrett:
 www.bindingfreedom.com
 www.starrett.com

With holes tapped, mix and add epoxy:

And mount:


I felt a little bad pulling off this weathered sticker, thinking, is this the last new '16 Monster to be found in the wild?

Wait a few hours:

Then go ski! (My buddy with Mt Shuksan in the background. The newly mounted Monsters are on my feet.):

If you are considering mounting your own bindings, please be aware of the risk you are undertaking. I recommend practicing several mounts on 2x4s before drilling into the real thing. It's also advisable to take the finished product into the shop for mount and setting verification.
I have used other available templates with success, but I decided to create my own, mostly for the fun of it, but also because I have found it difficult to cut templates to the right boot sole length (BSL) and join the templates together with good alignment. For this reason, I wrote a program to compute hole locations given a binding and BSL, while aligning the two pages is made easier with thin alignment marks that span the full page ensuring a straight template centerline. I also print two templates per set since center punching is destructive. The templates are available on my github. If you don't mind some Haskell programming you can also use the program to do things like compare holes locations of varying bindings, BSLs, and mount points, in case you are considering the optimal placement for a remount:
GitHub - tomahawkins/binding-templates: Alpine binding mounting templates.
Alpine binding mounting templates. Contribute to tomahawkins/binding-templates development by creating an account on GitHub.
github.com
For this slideshow I'm mounting a pair of Marker Griffons set at 334mm BSL. Here is the corresponding template:
binding-templates/marker-royal/marker-royal-bsl-334.svg at master · tomahawkins/binding-templates
Alpine binding mounting templates. Contribute to tomahawkins/binding-templates development by creating an account on GitHub.
github.com
And here it is printed out. Be sure to check correct printer scaling:
First trim of the corners of one page right through the two alignment marks:
This allow one page to be aligned with the other:
When you're satisfied, carefully tape together, front and back:
The final template prep requires cutting see-through holes at the intersections of the centerlines and the midsole line. We also need to trim the ends so that the centerlines run right to the edge of the paper:
Now get some skis to mount. I came across a brand new pair of 2016 (?) Head Monster 88s still in plastic being sold out of a scuba shop in Tennessee.
(Dear Head, Please bring back the Monster, preferably with the classic non-hammerhead tip. It's one of the best of all time.)
Skis mark the suggested mount point in various ways. These Monsters had it on the sidewall:
Mark you desired mount point with masking tape. I put Xs on one edge so I don't confuse the right edge with the wrong:
Place the template on the skis with the mount point aligned with the midsole line, view through the holes:
Now place 3-4 layers of tape on the approximate ski centerline where the template edges land. The extra layers of tape prevent the marking gauge from cutting through and defacing your new pair of skis:
Mark on the tap where the template edge lands:
Using a marking gauge, find the center of the ski, repeatedly checking one side and then the other, closing in on the center. I recommend this marking gauge from Lee Valley Tools:
Once you have the center, mark the tape using both ski edges. If you have a short turn radius ski, this mark should look like an squashed X, which is okay. With these Monsters (184), it's pretty much a straight line:
Now align the template on the ski using the front centerline mark, the rear centerline mark, and the midsole / mount point mark:
Carefully tape the template to the ski. Tape down the see-through hole for better security:
Now it is time to center punch. I highly recommend getting an optical center punch: they provide good accuracy and they make you feel like a submarine captain peering through a periscope. I use this one by Fowler:
Target in sight:
Target acquired!
Fire! (Replace the optical eyepiece with the punch and wack it with a hammer.):
All marks punched:
Remove all the templates and tape:
Center punching is more than just marks. It dimples the surface allowing a drill bit to find the hole center without wandering. I use a 1/16" bit as a pilot hole:
The main bit is 5/32", which is just under the standard 4.1mm and still large enough to be tapped. Mark the correct depth on the bits with tape; in this case, 9.5 mm:
Until recently I have hand drilled the pilot and main holes. However, I just got this mini drill press to make the work easier. It's from Grizzly, but it is a Chinese make found under a number of different brands:
Variable-Speed Mini Benchtop Drill Press
<h1>T32006 Variable-Speed Mini Benchtop Drill Press</h1> <h2>Better than a hand-held drill for making accurate 90° holes.</h2> <p>Whether you are making doll furniture, model train sets, jewelry or custom ammunition, this space-saving machine is just what you need for your delicate work.</p>...
Set the correct depth for the pilot holes:
Drill the pilots. Unlike with a hand drill, I've found that the drill press takes more effort to get good alignment, but once you do, it's much easier to drill:
Next set the depth with the main bit and drill. If the ski can slide freely on the table surface, the main bit will automatically find and align with the pilot hole:
Holes drilled!
Hole tapping next. I use a tap from Binding Freedom and a long tap wrench from Starrett:
12AB3 Alpine Tap TIN coated
The original inserts for skis, made in america and the best option for getting the most out of your skis and bindings. We also offer Jigarex and any tools you could need for traditional mounts as well.
www.bindingfreedom.com
93E T-Handle Tap Wrench
The Starrett 93 T-Handle Tap Wrench is for holding taps, drills, reamers and other small tools to be turned by hand. It is properly heat treated to withstand ordinary shop use. The jaw conforms to the tool being held, making it rigid and less apt to loosen. The wrench has a sliding handle that...
With holes tapped, mix and add epoxy:
And mount:
I felt a little bad pulling off this weathered sticker, thinking, is this the last new '16 Monster to be found in the wild?
Wait a few hours:
Then go ski! (My buddy with Mt Shuksan in the background. The newly mounted Monsters are on my feet.):
Attachments
Last edited:

 - he used to have a good deal on a pair of bits with both diameters


