• For more information on how to avoid pop-up ads and still support SkiTalk click HERE.

Mounting Bindings with Paper Templates

Thread Starter
TS
T

tomahawkins

Making fresh tracks
Skier
SkiTalk Supporter
Joined
Dec 3, 2019
Posts
1,856
Location
Bellingham, WA
I think if I were to print my own paper templates I would adjust for the boot lenght in the document file so that I could print our both the heel and toe locations on one sheet. Legal size paper should be long enough for most boots up to about 310mm. I would also include a a ruler scale so I could easily check that it was printed to scale accurately, and somme long straight lines to prove that there was no distortion in the print.

dm


How does this look?

 
Thread Starter
TS
T

tomahawkins

Making fresh tracks
Skier
SkiTalk Supporter
Joined
Dec 3, 2019
Posts
1,856
Location
Bellingham, WA
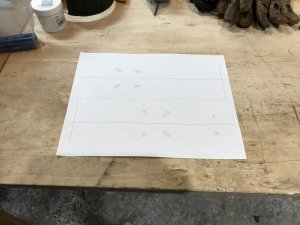
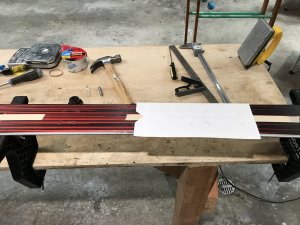
A new procedure I like better. Heel and toe templates are printed on the same sheet. The process doesn't require taping the templates together, but you do need to find the centerpoint at the midsole line.

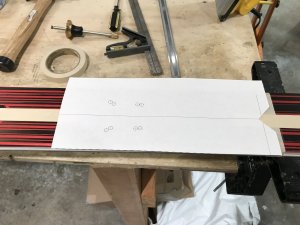
The new template format:

IMG_4689.jpeg

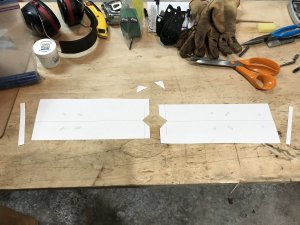
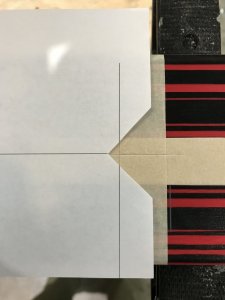
The template prep involves separating the heel and toe, trimming off the ends, and cutting notches to expose the centerpoint of the midsole lines:

IMG_4690.jpeg

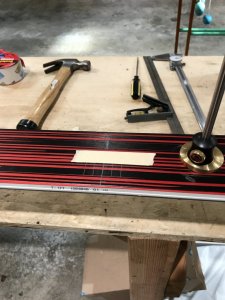
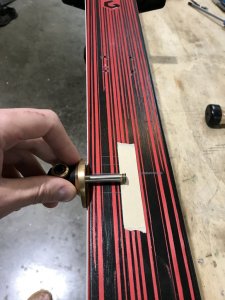
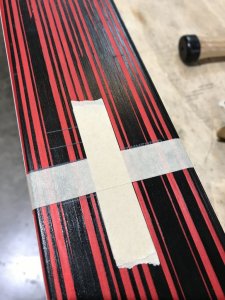
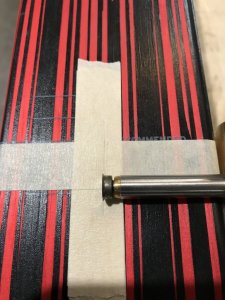
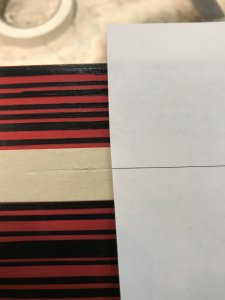
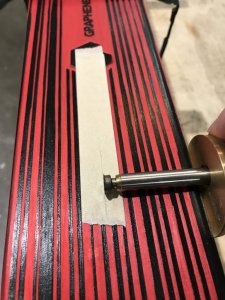
Add a few layers of tape at the center over the mount point. Find the center with the marking gauge:

IMG_4685.jpeg
IMG_4686.jpeg

Place tape on the mount line over the marked center tape and scribe the centerline over both:

IMG_4687.jpeg
IMG_4688.jpeg

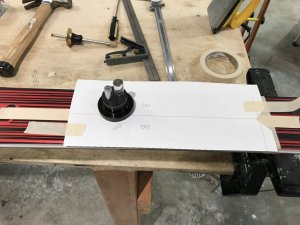
Add layers of tape for the front center mark of the toe template, find and scribe the center with the marking gauge, align and tapedown the template, and then center punch the hole marks:

IMG_4691.jpeg
IMG_4693.jpeg
IMG_4694.jpeg
IMG_4695.jpeg
IMG_4696.jpeg

Then repeat the process for the heel:

IMG_4697.jpeg
 

Attachments

  • IMG_4692.jpeg
    IMG_4692.jpeg
    172.7 KB · Views: 46

Noodler

Sir Turn-a-lot
Skier
Joined
Oct 4, 2017
Posts
6,442
Location
Denver, CO
Did I miss something or what are we supposed to do with files in .SVG format? I know these are CAD, but most templates are published as PDF. Any suggestions to do a conversion without fouling them up?
 
Thread Starter
TS
T

tomahawkins

Making fresh tracks
Skier
SkiTalk Supporter
Joined
Dec 3, 2019
Posts
1,856
Location
Bellingham, WA
Did I miss something or what are we supposed to do with files in .SVG format? I know these are CAD, but most templates are published as PDF. Any suggestions to do a conversion without fouling them up?

SVG should be supported by most browsers. In Chrome, I do a right click on one of my github templates and "Open Image in New Tab", then print from there. PDF would be nice, but it's an unwieldy filetype to program with, where as Scalable Vector Graphics (SVG) is just text and mostly legible at that. If you open up one of these templates files, it's basically just a bunch of line and circle definitions:

Code:
<?xml version="1.0"?>
<!DOCTYPE svg PUBLIC "-//W3C//DTD SVG 1.1//EN"
"http://www.w3.org/Graphics/SVG/1.1/DTD/svg11.dtd">
<svg xmlns="http://www.w3.org/2000/svg" version="1.2" width="190.0mm" height="259.0mm" viewBox="0 0 190.0 259.0" >
  <line x1="95.0" y1="0.0" x2="95.0" y2="259.0" stroke="black" stroke-width="0.1" stroke-dasharray="2 2" />
  <line x1="47.5" y1="0.0" x2="47.5" y2="259.0" stroke="black" stroke-width="0.1" />
  ...
  <circle cx="33.0" cy="123.0" r="2.5" fill="none" stroke="black" stroke-width="0.1" />
  <line x1="32.5" y1="123.0" x2="33.5" y2="123.0" stroke="black" stroke-width="0.1" />
  <line x1="33.0" y1="122.5" x2="33.0" y2="123.5" stroke="black" stroke-width="0.1" />
  <line x1="30.0" y1="123.0" x2="31.0" y2="123.0" stroke="black" stroke-width="0.1" />
  <line x1="35.0" y1="123.0" x2="36.0" y2="123.0" stroke="black" stroke-width="0.1" />
  <line x1="33.0" y1="120.0" x2="33.0" y2="121.0" stroke="black" stroke-width="0.1" />
  <line x1="33.0" y1="125.0" x2="33.0" y2="126.0" stroke="black" stroke-width="0.1" />
</svg>
 

Noodler

Sir Turn-a-lot
Skier
Joined
Oct 4, 2017
Posts
6,442
Location
Denver, CO
SVG should be supported by most browsers. In Chrome, I do a right click on one of my github templates and "Open Image in New Tab", then print from there. PDF would be nice, but it's an unwieldy filetype to program with, where as Scalable Vector Graphics (SVG) is just text and mostly legible at that. If you open up one of these templates files, it's basically just a bunch of line and circle definitions:

I use Firefox. I see the image in GitHub, but I cannot print it or download it.

Edit update: I was able to download by right-clicking on the image in GitHub. However when I print that image it is not scaling correctly. I could really use a step by step on how to use the files to get to the point where you have a usable printout.
 
Thread Starter
TS
T

tomahawkins

Making fresh tracks
Skier
SkiTalk Supporter
Joined
Dec 3, 2019
Posts
1,856
Location
Bellingham, WA
I was able to download by right-clicking on the image in GitHub. However when I print that image it is not scaling correctly. I could really use a step by step on how to use the files to get to the point where you have a usable printout.

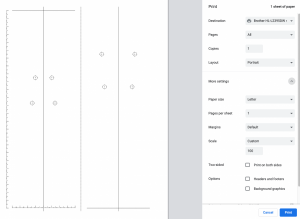
You probably need to go into your printer options. On mine there was a "custom scaling" option that I set to 100 (%).
 

Noodler

Sir Turn-a-lot
Skier
Joined
Oct 4, 2017
Posts
6,442
Location
Denver, CO
You probably need to go into your printer options. On mine there was a "custom scaling" option that I set to 100 (%).

The problem is that the printout ends up with a header and a footer, I know about the scaling options. My point is that SVG doesn't seem to be very approachable for most folks (at least those that run Firefox). What are the exact steps you're using to get the printout correct?
 

Doug Briggs

"Douche Bag Local"
Industry Insider
SkiTalk Tester
Joined
Nov 9, 2015
Posts
7,552
Location
Breckenridge, CO
Sure. A marking gauge is for scribing a parallel line to some reference edge. Most have a pin for scribing the line, this one has a sharp disc:

View attachment 128758
View attachment 128759

There are two adjustments: the coarse adjustment slides the shaft:

View attachment 128760
View attachment 128761

And the knob at the end provides fine adjustments:

View attachment 128762

With several layers of tape on the ski (the scribing disc will easily cut through 3) and a pencil mark at the approximate location of the template, take your best guess at the center of the ski and lightly press down on the gauge to mark the tape:

View attachment 128763
View attachment 128764

Keeping the adjustment fixed, mark the tape using the other edge of the ski:

View attachment 128765

View attachment 128766

With the two marks on the tape, repeat the process. At this point, the fine adjustment knob is probably all you need. After 2 or 3 iterations, you will quickly reach sub-millimeter accuracy.

View attachment 128767

Now with the gauge set, put down a fresh layer of tape to hide the marks and scribe a line using one edge:

View attachment 128768

And then the other:

View attachment 128769

With a low radius ski like this SL (because the ski edges are not parallel), you will end up with a squashed X:

View attachment 128770

Center finding with no measuring. It's a great little tool.

View attachment 128771
I like the marking guage. It would appear to contact the edges, not the sidewall which IMO are the correct side reference. Shop jigs hit the edges, not the sidewalls.

When I do free hand mounts in the shop I use a jig with a centered hole to find the center line. It is pretty reliable and quick.
 

mdf

entering the Big Couloir
Skier
Team Gathermeister
SkiTalk Supporter
Joined
Nov 12, 2015
Posts
7,299
Location
Boston Suburbs
It's pretty simple, actually.
In Firefox,
Right click
save image as
stay with the default download format, which is *.svg
Then go to the download arrow in the upper right hand corner of the Firefox header,
click on it
At least for me, it opens the svg in a new tab in Firefox.
Go to that new tab.
Click the 3-bar "hamburger" menu in the upper right.
Choose "print"
Choose "save as pdf" -- I think that is a standard thing, not an add-on.
Near the bottom of the dialog, change margins dropdown to "Custom (inches)"
Change the top and bottom to 0.25
The result is a pdf with just the picture in it, no headers.


edit - add custom margin steps

(Now the next question is if your physical printer will let you print that close to the edges of the paper, or if you need to get legal size paper.)
 
Last edited:
Thread Starter
TS
T

tomahawkins

Making fresh tracks
Skier
SkiTalk Supporter
Joined
Dec 3, 2019
Posts
1,856
Location
Bellingham, WA
I added templates for Rossignol IFP (nordic plate). With the nordic mount point as the toe pivot point, the heel support holes run off the sheet for larger boot sizes -- I'll fix a workaround at some point.


Spam16v

Zac
Skier
Joined
Jun 10, 2021
Posts
65
Location
WNY
E22EF083-F9EF-4FA0-B581-61A8FAA35F00.jpeg
2992FD0D-F643-45B6-A0AA-19C67889C5C3.jpeg
B3357FED-5508-4631-A6E9-E1584EC5445D.jpeg


I used nearly the same methods as the OP. I took a lot of info from the “Mount your own f*cking skis” thread on Teton Gravity forums. I matched the distances with dial calipers to find center just like his adjustable guide, then centerline with blue tape. Printed Look Pivot templates. Used an awl to center punch the metal laminate but opted for Wintersteiger step drills and tap with an 8mm metric drill guide to ensure holes were straight. They’re not super expensive, and for home use will last a long time. I had a set screw back out and a collar move and punched a hole in my brand new Line Sick Day 95’s last year I’ll never forget. First set was scary, learn as you go, now I find it relaxing. Double & triple check. Another bit of advice, never trust the printed top sheet, trust the mold lines. These Chinese made Line skis, neither top sheet lined up or is on straight. Measure and verify your mounting locations.
 

Philpug

Notorious P.U.G.
Admin
SkiTalk Tester
Joined
Nov 1, 2015
Posts
42,937
Location
Reno, eNVy
View attachment 135704 View attachment 135705 View attachment 135706

I used nearly the same methods as the OP. I took a lot of info from the “Mount your own f*cking skis” thread on Teton Gravity forums. I matched the distances with dial calipers to find center just like his adjustable guide, then centerline with blue tape. Printed Look Pivot templates. Used an awl to center punch the metal laminate but opted for Wintersteiger step drills and tap with an 8mm metric drill guide to ensure holes were straight. They’re not super expensive, and for home use will last a long time. I had a set screw back out and a collar move and punched a hole in my brand new Line Sick Day 95’s last year I’ll never forget. First set was scary, learn as you go, now I find it relaxing. Double & triple check. Another bit of advice, never trust the printed top sheet, trust the mold lines. These Chinese made Line skis, neither top sheet lined up or is on straight. Measure and verify your mounting locations.
That Blade with the Pivot15 will be a fun set up.
 

dan ross

Making fresh tracks
Skier
Joined
Dec 27, 2016
Posts
1,297
Hats off to @tomahawkins for the effort in putting this together. My only comment is to be aware that paper is hygroscopic - it expands /contracts with changes in humidity so putting a reference scale to check for accuracy is a good idea. ( This is why you never scale off of a blueprint if accuracy is important) If you can, print onto Mylar as it’s dimensionally stable and far more durable. This may seem like overkill but skis are expensive and being off by a millimeter is enough to ruin your day.
 

Uncle-A

In the words of Paul Simon "You can call me Al"
Skier
Joined
Dec 22, 2015
Posts
10,981
Location
NJ
Here's a slideshow outlining how I mount bindings with paper templates. I'm not a ski tech so don't take this as a definitive how-to; it's just a procedure that has worked well for me. There's always room for improvement, so if you have suggestions, please offer them up. I like the procedure because there is no measurement involved -- aside from marking the 9.5mm depth on the drill bits. I find it yields a high degree of accuracy: the printer is probably the greatest source of error in the process. As I go through the steps I'll add links to the various tools I find helpful.

If you are considering mounting your own bindings, please be aware of the risk you are undertaking. I recommend practicing several mounts on 2x4s before drilling into the real thing. It's also advisable to take the finished product into the shop for mount and setting verification.

I have used other available templates with success, but I decided to create my own, mostly for the fun of it, but also because I have found it difficult to cut templates to the right boot sole length (BSL) and join the templates together with good alignment. For this reason, I wrote a program to compute hole locations given a binding and BSL, while aligning the two pages is made easier with thin alignment marks that span the full page ensuring a straight template centerline. I also print two templates per set since center punching is destructive. The templates are available on my github. If you don't mind some Haskell programming you can also use the program to do things like compare holes locations of varying bindings, BSLs, and mount points, in case you are considering the optimal placement for a remount:


For this slideshow I'm mounting a pair of Marker Griffons set at 334mm BSL. Here is the corresponding template:


And here it is printed out. Be sure to check correct printer scaling:

View attachment 128536

First trim of the corners of one page right through the two alignment marks:

View attachment 128537

This allow one page to be aligned with the other:

View attachment 128538

When you're satisfied, carefully tape together, front and back:

View attachment 128539

The final template prep requires cutting see-through holes at the intersections of the centerlines and the midsole line. We also need to trim the ends so that the centerlines run right to the edge of the paper:

View attachment 128540

Now get some skis to mount. I came across a brand new pair of 2016 (?) Head Monster 88s still in plastic being sold out of a scuba shop in Tennessee.
(Dear Head, Please bring back the Monster, preferably with the classic non-hammerhead tip. It's one of the best of all time.)

View attachment 128541

Skis mark the suggested mount point in various ways. These Monsters had it on the sidewall:

View attachment 128542

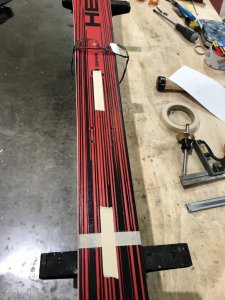
Mark you desired mount point with masking tape. I put Xs on one edge so I don't confuse the right edge with the wrong:

View attachment 128543

Place the template on the skis with the mount point aligned with the midsole line, view through the holes:

View attachment 128544

View attachment 128545

Now place 3-4 layers of tape on the approximate ski centerline where the template edges land. The extra layers of tape prevent the marking gauge from cutting through and defacing your new pair of skis:

View attachment 128546

Mark on the tap where the template edge lands:

View attachment 128547

Using a marking gauge, find the center of the ski, repeatedly checking one side and then the other, closing in on the center. I recommend this marking gauge from Lee Valley Tools:


View attachment 128548

Once you have the center, mark the tape using both ski edges. If you have a short turn radius ski, this mark should look like an squashed X, which is okay. With these Monsters (184), it's pretty much a straight line:

View attachment 128549

Now align the template on the ski using the front centerline mark, the rear centerline mark, and the midsole / mount point mark:

View attachment 128550
View attachment 128552
View attachment 128551

Carefully tape the template to the ski. Tape down the see-through hole for better security:

View attachment 128553

Now it is time to center punch. I highly recommend getting an optical center punch: they provide good accuracy and they make you feel like a submarine captain peering through a periscope. I use this one by Fowler:


View attachment 128555

Target in sight:

View attachment 128556

Target acquired!

View attachment 128557

Fire! (Replace the optical eyepiece with the punch and wack it with a hammer.):

View attachment 128558

All marks punched:

View attachment 128559

Remove all the templates and tape:

View attachment 128560
View attachment 128561

Center punching is more than just marks. It dimples the surface allowing a drill bit to find the hole center without wandering. I use a 1/16" bit as a pilot hole:

View attachment 128562

The main bit is 5/32", which is just under the standard 4.1mm and still large enough to be tapped. Mark the correct depth on the bits with tape; in this case, 9.5 mm:

View attachment 128563

Until recently I have hand drilled the pilot and main holes. However, I just got this mini drill press to make the work easier. It's from Grizzly, but it is a Chinese make found under a number of different brands:


View attachment 128564

Set the correct depth for the pilot holes:

View attachment 128565

Drill the pilots. Unlike with a hand drill, I've found that the drill press takes more effort to get good alignment, but once you do, it's much easier to drill:

View attachment 128566

Next set the depth with the main bit and drill. If the ski can slide freely on the table surface, the main bit will automatically find and align with the pilot hole:

View attachment 128567

Holes drilled!

View attachment 128568

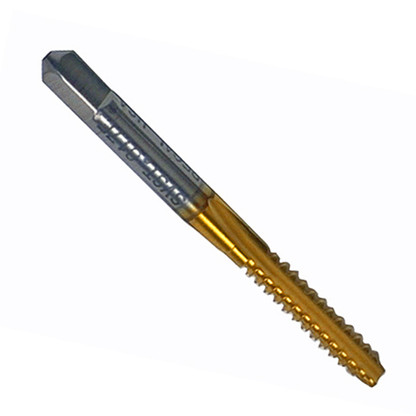
Hole tapping next. I use a tap from Binding Freedom and a long tap wrench from Starrett:


View attachment 128571

With holes tapped, mix and add epoxy:

View attachment 128572

And mount:

View attachment 128573
View attachment 128574

I felt a little bad pulling off this weathered sticker, thinking, is this the last new '16 Monster to be found in the wild?

View attachment 128575

Wait a few hours:

View attachment 128576

Then go ski! (My buddy with Mt Shuksan in the background. The newly mounted Monsters are on my feet.):

View attachment 128577
Thanks to @tomahawkins for such a great job. It may even be better than some manufacturers template that ski shops have to purchase. Having seen first hand what other shops have done to customers equipment, this has so much precision you can't fault the method. It might even be over kill when you know that skiers move bindings forward or back from the manufacturers mounting mark or the heel on most bindings have some type of track to slide the heel forward or back for when an owner gets new boots. Again great job.
 

mdf

entering the Big Couloir
Skier
Team Gathermeister
SkiTalk Supporter
Joined
Nov 12, 2015
Posts
7,299
Location
Boston Suburbs
Another round of applause.... I used Tom's template and (mostly) his method when I mounted my bindings in April. Pretty easy and no problems with the process or skiing on the results afterwards.
 

Sponsor

Staff online

Top