• For more information on how to avoid pop-up ads and still support SkiTalk click HERE.

Building a truck bed shell

Thread Starter
TS
Doug Briggs

Doug Briggs

"Douche Bag Local"
Industry Insider
SkiTalk Tester
Joined
Nov 9, 2015
Posts
7,552
Location
Breckenridge, CO
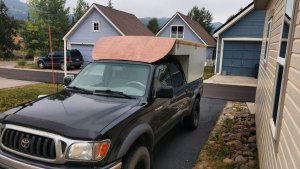
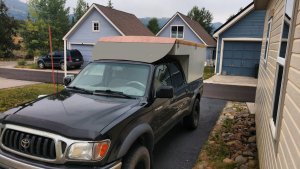
I am using the luann I mentioned above since it's on hand. The ribs have been added (top and bottom) giving it good stiffness. I'll put some 6 oz. fiberglass on it. I think I'll leave the top 3 inches natural to match the shell and the rest will be gray.

Protyping the perforated steel angle system.

IMG_20210706_124718_DRO.jpg


IMG_20210706_124726_DRO.jpg


Test driving the fairing prior to final trimming. 0:00 to 0:21 is verifying the steel angles will work. 0:21 to 0:51 demonstrates that there is still some turbulence on the roof. The fairing's top edge is 1" proud of the roof line in this test. That will be adjust to the same height as the roof. The final interval 0:51 to end shows that the fairing is quite rigid and the small 1/4" gap at the front edge won't flex/bend/contort to hit the roof of the truck.

IMG_20210708_093659_DRO.jpg

This is the 'final' shape. The top edge of the fairing will get sanded down to match the roof line exactly. The gap between the fairing and the leading of the roof is about 1/2 inch to allow for the roof to be raised. If I don't achieve my desired mileage (20 mpg, the best the truck has ever gotten is 21 mpg), I'll add a flexible strip to fill that void. I think the gap is small enough to be insignificant.

I'm happy with the rigidity of the system. Glassing it will help to make it even more rigid. I'm surprised at how closely the system follows the arch of the roof of the truck.

IMG_20210708_113019_DRO.jpg

The final steel angle support. Bolted together and no more c-clamps. I'm only slightly disappointed that the two racks won't be able to be used for any type of storage. Maybe some essential materials (tarps ?) could be rolled and placed in the voids. Not a big deal as the shell is the intended storage location for my gear.

IMG_20210708_113046_DRO.jpg

This shows the detail of the two pieces of 1/4" plywood laminated up in an arc to create the rib to support the fairing. Sanding and final shaping of the edge is required.

IMG_20210708_113054_DRO.jpg
 
Last edited:

cantunamunch

Meh
Skier
Joined
Nov 17, 2015
Posts
22,193
Location
Lukey's boat
210707 : you still have a horizontal vortex sitting behind fairing, above the shell?

Unattached flow there bad. But the good news is that is a classic use case for vortex generators sitting on the shell itself.
 
Last edited:

oldschoolskier

Making fresh tracks
Skier
Joined
Dec 6, 2015
Posts
4,288
Location
Ontario Canada
Last trick or two is to a a small spoiler at the rear end of the can to pull the air flow down the back to reduce the vacuum pocket (aka drag chute) created by pushing the brick through the air. This is a small spoiler directed down, and not used for down force. Could squeeze out another 1/2mpg for you.

Also add a little flairing to the rear doors to smooth the entry into that transition.

Trick I saw recently was use the gap (and result) is to use the pressure zone to pump air through, by leaving the rear lip proud, release the air here which will reduce the turbulence on top a little. While this design in the video is way in excess of you want, this should explain it.

 
Thread Starter
TS
Doug Briggs

Doug Briggs

"Douche Bag Local"
Industry Insider
SkiTalk Tester
Joined
Nov 9, 2015
Posts
7,552
Location
Breckenridge, CO
The fairing is a bit closer to the level of the shell roof; within 1/4 inch of the same height. The gap is 1/2 to 3/4 inch depending on where you measure. I could trim the fairing down but I plan to have flexible solar panels glued to the roof right near the leading edge of the roof. That will reduce the vertical differential. If I'm able to reliably get 20 mpg, then I'm pretty much maxed out on what I'll ever get from this vehicle.

I have given thought to the trailing edge spoiler. My family had wagons with them. Back then they were intended to keep the rear window clear, IIRC. When I have finished building out the back section that will enclose the area below the roof and above the folded down tailgate, I'll consider adding the spoiler.

The vortex generators are an interesting concept that I've seen online but rarely, if ever, IRL.

Thanks for your feedback on my project. I'll keep posting as things move forward. Today I plan to glass the forward facing side of the fairing. Paint to follow and then some time tracking mileage. I'm very happy that I have casually monitored the mileage as I have a pretty good target reference point.

With all the recommendations for the last 1/2 mpg improvements I may end up with the best mileage ever. At 145K miles, no less. ;)
 
Thread Starter
TS
Doug Briggs

Doug Briggs

"Douche Bag Local"
Industry Insider
SkiTalk Tester
Joined
Nov 9, 2015
Posts
7,552
Location
Breckenridge, CO
The fairing is complete except for color considerations.

Should I leave it natural? Or carry the gray 'around the corner'?
IMG_20210714_110334_DRO.jpg IMG_20210714_110334_DRO.jpg

The challenge with gray will be to transfer a horizontal line across the arced fairing.
 

cantunamunch

Meh
Skier
Joined
Nov 17, 2015
Posts
22,193
Location
Lukey's boat
The vortex generators are an interesting concept that I've seen online but rarely, if ever, IRL.

They were popular among the Mitsubishi Lancer EVO look-alike crowd, but nowadays most of the people interested in them are driving RVs.

Airtabs are the recognized brand name for DIY - but never, ever, believe a marketing cartoon and always do your own tuft testing.


Which brings me to rear spoilers - I don't have a differential pressure testing setup and I would never do a rear spoiler without having net effect data.

Without differential air pressure data, wake reduction is a costly guesswork.

Costly both in materials/fabrication and in drag - remember that an effective wing always adds drag. Some effective spoilers (as opposed to wings) don't add net drag, but they work by creating a high pressure zone next to a suitable surface (like sloped rear windows on old muscle cars). Pressure testing, again.
 
Thread Starter
TS
Doug Briggs

Doug Briggs

"Douche Bag Local"
Industry Insider
SkiTalk Tester
Joined
Nov 9, 2015
Posts
7,552
Location
Breckenridge, CO
The fairing is complete.

1626708346796.png


IMG_20210717_212129_DRO.jpg

Luan mahogany with one layer of 6 oz. fiberglass, three coats of epoxy. Gray is marine topside paint (carriage bolts painted separately then installed), spar urethane over the fiberglass/epoxy on the wood stripe. Spar urethane on the backside.

Regarding vortex generators and other deflectors: I'm going to wait to see what performance I get. If I get anything 20 MPG or better on the highway, that is as good as I ever get so my search for MPG will be done. A rear edge spoiler to keep the back clean for visibility is still in the contemplation stage. First I have to finish the boxing in of the 'over tailgate' area.

I laid out and cut all my leftover plywood yesterday so construction of the final module over the tailgate should proceed quickly. I'm removing the metal gate and replacing it with a fixed one made from wood. I'm doing this for:
  • for weight savings
  • easier integration into the module
  • the metal tailgate, when down, will bounce up on bumps. trying to manage that would be difficult at best and possibly damage the structure that would be on top of it.
I'm building the back to open with two 'barn' doors. Use one if entering without gear. Open both for loading gear. It will still be wide enough to load 4 foot wide sheets for further projects. ;)
 
Thread Starter
TS
Doug Briggs

Doug Briggs

"Douche Bag Local"
Industry Insider
SkiTalk Tester
Joined
Nov 9, 2015
Posts
7,552
Location
Breckenridge, CO
Thanks, @cantunamunch. I'm enjoying the process. The looks have exceeded my expectations. I'm hoping to find the function does, too, as I complete the berth, stock it with camping gear and hit the road. But first, the final module needs finishing.
 
Thread Starter
TS
Doug Briggs

Doug Briggs

"Douche Bag Local"
Industry Insider
SkiTalk Tester
Joined
Nov 9, 2015
Posts
7,552
Location
Breckenridge, CO
On to making more custom wood parts. Similar to how I made the arced beams for the roof, I am creating a pair of side jams (had to look up the proper term) for the barn doors. There'll be some routing to get the final part, but this is the layup for the first rough step. Additional rabbets on the edges of one side will fit rabbets on the side walls. A 1/2" by 1/2" rubber gasket will be attached to the rabbet on the other side.

IMG_20210719_193538_DRO.jpg

There are four pieces of 1/2 with epoxy between the top two and bottom two pieces to end up with 2 fabricated jams.

IMG_20210719_193522_DRO.jpg

The 'press' is an old garage door opener rail that I saved for just this purpose. Kidding. I saved it because I thought it would come in handy but I was thinking as a berth support rail of some sort.

Plywood is rarely perfectly straight and the source panel for these pieces were no exception. By laminating them with the deflections of the wood opposite each other: )( or (), then gluing them together, I hope to end up with pretty straight beams for the jams. I'll do a similar layup with the trailing edge of the tailgate replacement to a) make them straight and b) strong enough to take a beating and keep on going.
 
Thread Starter
TS
Doug Briggs

Doug Briggs

"Douche Bag Local"
Industry Insider
SkiTalk Tester
Joined
Nov 9, 2015
Posts
7,552
Location
Breckenridge, CO
FYI, the 'press' worked beautifully and the previously warped pieces are now totally straight and flat.
 
Thread Starter
TS
Doug Briggs

Doug Briggs

"Douche Bag Local"
Industry Insider
SkiTalk Tester
Joined
Nov 9, 2015
Posts
7,552
Location
Breckenridge, CO
I spent a few days (off and on) building up all the parts I could do in advance. The assembly begins now.

IMG_20210730_115435_DRO.jpg

The tailgate was removed and a wooden one is being built. It should be lighter than the original and not bounce when down as tailgates will do. I'm using the bolt holes in the truck to tie the lower walls to the truck bed which will also provide most of the support via cantilever to the tailgate.

IMG_20210730_115508_DRO.jpg


IMG_20210730_115558_DRO.jpg

Triangular walls and a pair of 'barn' doors will fill out this removable module.
 
Thread Starter
TS
Doug Briggs

Doug Briggs

"Douche Bag Local"
Industry Insider
SkiTalk Tester
Joined
Nov 9, 2015
Posts
7,552
Location
Breckenridge, CO
More progress. The uprights and top crosspiece are now in place.

IMG_20210731_123323_DRO.jpg

Epoxy with silica thickener added.

IMG_20210731_123317_DRO.jpg

Thickened epoxy applied to the rabbet/contact points. The same areas are brushed with unthickened epoxy prior to the thickened to allow the unthickened to penetrate the wood. Without the pre-wetting, the epoxy in the joint will get sucked into the wood and potentially weaken the bond.

IMG_20210731_123336_DRO.jpg

And to the mating locations already in place.

IMG_20210731_130356_DRO.jpg

All clamped up. The bottom of the tailgate and the triangular voids on the sides will be covered in 1/4" plywood. The top of the tailgate will be 1/4" ply, but removable to ease the bolting of the section to the truck. The twin barn doors will have strap hinges that set on pintles to allow the doors to be quickly removed as needed for transporting 'stuff'.
 
Thread Starter
TS
Doug Briggs

Doug Briggs

"Douche Bag Local"
Industry Insider
SkiTalk Tester
Joined
Nov 9, 2015
Posts
7,552
Location
Breckenridge, CO
IMG_20210803_121659_DRO.jpg

The complete door frame.

With the door frame built I could start to add the side pieces to box in the whole rigamarole.

IMG_20210804_155608_DRO.jpg

The bottom of the new tail gate was added, then the mostly unseen horizontal piece above the tailgate support, and finally the top triangles. The top of the tailgate will screw on (with SS screws and threaded inserts) as I made it to rest on the truck bed. I need to access the space under the tailgate to install/remove the bottom bolt.

I am very pleased with how strong the tailgate is. With 4 bolts on each side connecting the tailgate supports (2 1/2" pieces of plywood glued up to make a 1" piece of plywood) to the truck bed (using the bolt holes from replacing the hardware for the original tailgate) this is pretty solid. I have built things to match up pretty tight between the shell proper, the modular back door assembly and the bed.

I did a test earlier to see how much the truck flexes when raised on diagonal wheels. There was 1 to 2 mm movement between the cab and the shell. As the bed is a single unit and attached to the frame, I anticipate no problems with the close fit. If there are issues, I can sand away mating areas to give me more space.

The hinges should arrive soon, the lock bars and handles just arrived and I'm working with a local glass guy to get tempered glass and gaskets. Building the door panels will take place over the next few days.
 

socalgal

Making fresh tracks
Skier
Joined
Apr 24, 2017
Posts
1,584
View attachment 139168
The complete door frame.

With the door frame built I could start to add the side pieces to box in the whole rigamarole.

View attachment 139169
The bottom of the new tail gate was added, then the mostly unseen horizontal piece above the tailgate support, and finally the top triangles. The top of the tailgate will screw on (with SS screws and threaded inserts) as I made it to rest on the truck bed. I need to access the space under the tailgate to install/remove the bottom bolt.

I am very pleased with how strong the tailgate is. With 4 bolts on each side connecting the tailgate supports (2 1/2" pieces of plywood glued up to make a 1" piece of plywood) to the truck bed (using the bolt holes from replacing the hardware for the original tailgate) this is pretty solid. I have built things to match up pretty tight between the shell proper, the modular back door assembly and the bed.

I did a test earlier to see how much the truck flexes when raised on diagonal wheels. There was 1 to 2 mm movement between the cab and the shell. As the bed is a single unit and attached to the frame, I anticipate no problems with the close fit. If there are issues, I can sand away mating areas to give me more space.

The hinges should arrive soon, the lock bars and handles just arrived and I'm working with a local glass guy to get tempered glass and gaskets. Building the door panels will take place over the next few days.
It's been really great to follow along Doug. Great work!
 
Thread Starter
TS
Doug Briggs

Doug Briggs

"Douche Bag Local"
Industry Insider
SkiTalk Tester
Joined
Nov 9, 2015
Posts
7,552
Location
Breckenridge, CO
New pics!

IMG_20210805_150824_DRO.jpg

IMG_20210805_150802_DRO.jpg

IMG_20210805_150751_DRO.jpg

Next step the 'barn' doors. I might have it fully assembled soon! Hinges should be here soon. The glass shop has been slow in replying to my request for some custom tempered glass and gaskets but I'll get something done soon.
 
Thread Starter
TS
Doug Briggs

Doug Briggs

"Douche Bag Local"
Industry Insider
SkiTalk Tester
Joined
Nov 9, 2015
Posts
7,552
Location
Breckenridge, CO
I'm going to glass the entire exterior, contrary to just doing the roof and exposed edges on the main body. With all the inside and outside corners it is going to be a challenge. I'm going to try some butt joints where strength isn't essential. I'll glass the inside joints all around for strength, but just a few inches, not whole surfaces.
 

dan ross

Making fresh tracks
Skier
Joined
Dec 27, 2016
Posts
1,297
Really impressive work and thinking. Epoxy fillets, laminated beams , you are ready to build a boat and you have a truck to tow it with. Just sayin’....
 
Thread Starter
TS
Doug Briggs

Doug Briggs

"Douche Bag Local"
Industry Insider
SkiTalk Tester
Joined
Nov 9, 2015
Posts
7,552
Location
Breckenridge, CO
I got all the construction methods from boat building. The only boat I've built is a ultra-light canoe. The oak ribs failed pretty soon on. I'll stick with my plastic 21' sloop for sailing. There is too much work involved and too significant consequences to building a boat. I have what I need to get around the ocean comfortably at the moment.

ME trip 2 034.jpg

During my last trip to Moosehead.

The next project could be a 'foamie' tear drop (actually a square drop) trailer. Probably with a similar looking roof to match the toy box. FWIW, I'd call this shell toy box if I weren't trying to be slightly discreet about what I'm putting in it.
 

dan ross

Making fresh tracks
Skier
Joined
Dec 27, 2016
Posts
1,297
I got all the construction methods from boat building. The only boat I've built is a ultra-light canoe. The oak ribs failed pretty soon on. I'll stick with my plastic 21' sloop for sailing. There is too much work involved and too significant consequences to building a boat. I have what I need to get around the ocean comfortably at the moment.

View attachment 139337
During my last trip to Moosehead.

The next project could be a 'foamie' tear drop (actually a square drop) trailer. Probably with a similar looking roof to match the toy box. FWIW, I'd call this shell toy box if I weren't trying to be slightly discreet about what I'm putting in it.
That boat will do the trick. And yeah,bending ribs is a tough skill to learn almost more about the stock and how you cut them - there are still old timers around here that know these tricks but they are sadly disappearing. My success rate at bending ribs was less than 50%... as much kindling as ribs. If I was doing it again I’d laminate them
 
Last edited:

Sponsor

Staff online

  • Andy Mink
    Everyone loves spring skiing but not in January
Top